
Landscapes & World Building in Unreal Engine
A Complete Beginner's Guide to Creating Outdoor Environments
Learn to create vast outdoor environments using Unreal Engine's Landscape system, add realistic foliage, and set up complete game levels with proper lighting and atmosphere.

What You'll Learn
🏔️ Landscape System
Create and sculpt massive terrains with mountains, valleys, and natural features
🎨 Materials & Textures
Paint multiple textures on terrain and blend them naturally
🌲 Foliage Tools
Populate your world with trees, bushes, rocks, and vegetation
🎬 Post Processing
Set mood with color grading and cinematic camera effects
💡 Level Setup
Configure lighting, fog, sky, and atmosphere for complete scenes
🌍 World Building
Combine all systems to create beautiful, playable game environments
Tutorial Topics (Click to Jump)
Topic 1: Creating & Sculpting Landscapes
⏱️ 20-25 minutes
What landscapes are, creating terrain, sculpt tools, brushes, and falloff types
Topic 2: Landscape Materials & Foliage
⏱️ 25-30 minutes
Layer blending, painting textures, foliage system, and vegetation placement
Topic 3: Post Process & Cinematic Effects
⏱️ 20-25 minutes
Post Process Volumes, color grading, bloom, vignette, and mood setting
Topic 4: Complete World Setup
⏱️ 30-35 minutes
Essential level actors, lighting, fog, atmosphere, and building complete worlds
Tutorial 1: Creating & Sculpting Landscapes
⏱️ 20-25 minutes
What Are Landscapes?
Landscapes in Unreal Engine are specialized terrain systems designed for creating large outdoor environments. Unlike regular static meshes, landscapes are:
✓ Optimized for massive terrain (kilometers in scale)
✓ Editable in real-time (sculpt, paint, modify)
✓ Segmented for performance (LOD streaming)
✓ Perfect for open-world games
Common Uses:
• Mountains and valleys
• Plains and fields
• Desert dunes
• Rocky terrain
• Any natural outdoor environment
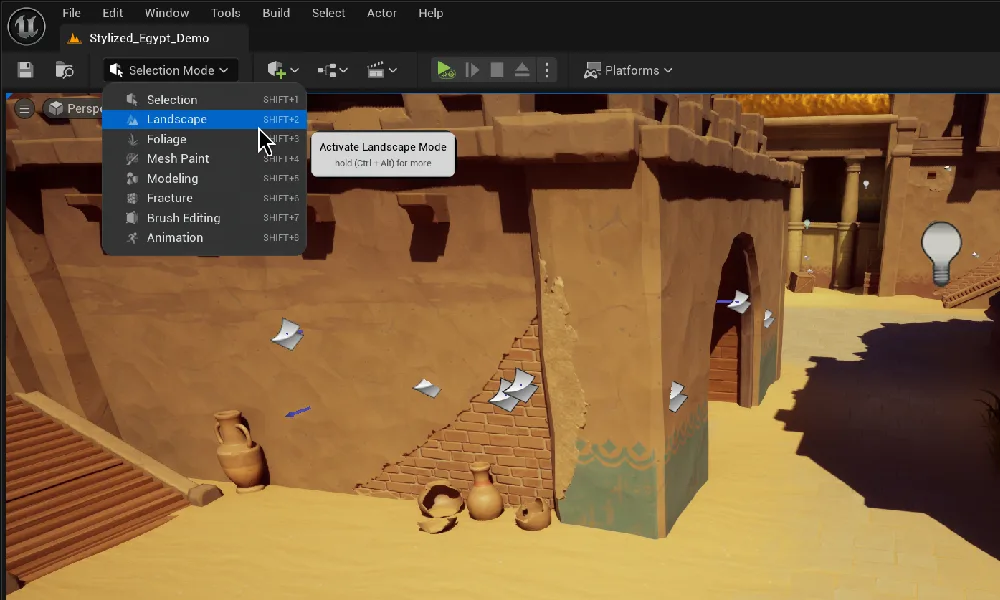
Activating Landscape Mode
To work with landscapes, you need to switch to Landscape Mode from the Modes panel.
1. Look for the Selection Mode dropdown (top left)
2. Click it to open the modes menu
3. Select Landscape (or press Shift+2)
4. The Landscape panel will appear
Creating Your First Landscape
Once in Landscape Mode, you'll see the Landscape panel with options to create a new landscape.
Fill World - Creates landscape sized to fill entire level
Create - Creates landscape with current settings
Import from File Tab:
• Import height maps from external software (World Machine, Gaea, etc.)
• Use grayscale PNG or RAW files
• Advanced workflow for realistic terrain
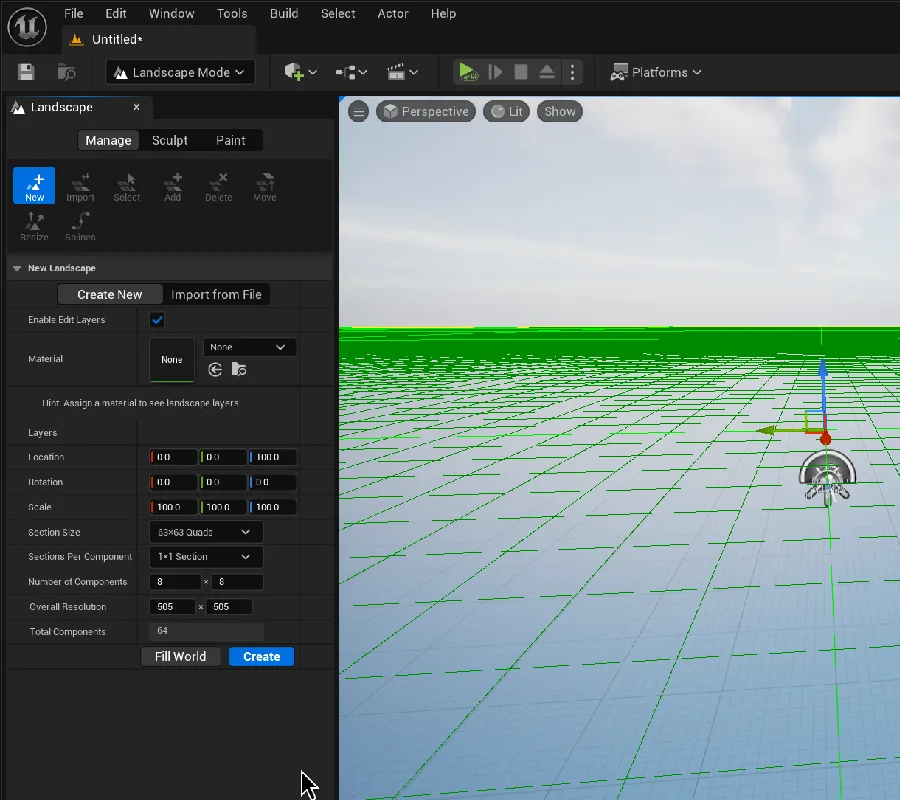
Understanding Section Size (CRITICAL!)
The Section Size setting is the most important performance consideration when creating landscapes.
• How detailed your landscape can be
• How many vertices (points) the landscape has
• How much memory it uses
• Your frame rate performance
The Balance:
Higher = More detail, Lower performance ⚠️
Lower = Less detail, Better performance ✓
Recommended Starting Point:
Section Size: 63×63 Quads
Sections Per Component: 1×1
Number of Components: 8×8
Sculpt Mode: The Tools
After creating a landscape, switch to the Sculpt tab to shape your terrain. Here are the essential tools:
• Default tool - raises or lowers terrain
• Left Click + Drag = Raise terrain
• Shift + Left Click + Drag = Lower terrain
Smooth Tool:
• Blends and softens harsh edges
• Use after sculpting to make terrain look natural
Flatten Tool:
• Click a height, then drag to flatten area to that height
• Perfect for creating plateaus or building foundations
Ramp Tool:
• Click two points to create a smooth ramp between them
• Great for roads, paths, or walkways
Erosion Tool:
• Simulates natural weathering and erosion
• Makes terrain look more realistic and organic
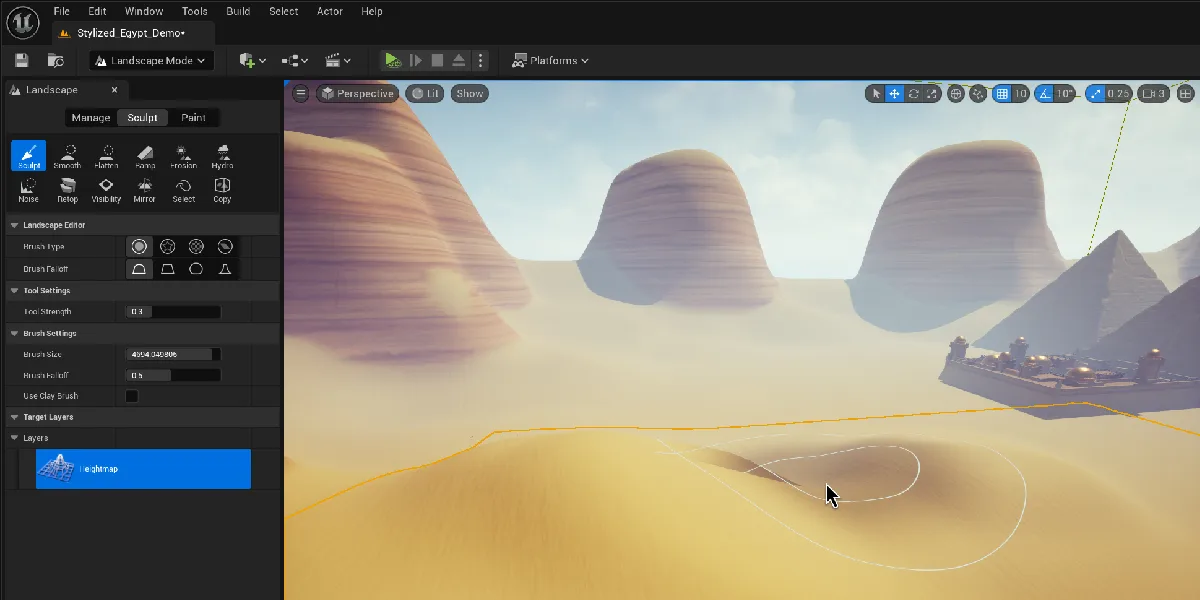
Brush Settings
Brushes control the shape of your sculpting tool.
• Default circular brush
• Most common and versatile
Alpha Brush:
• Uses a texture as a stamp
• Create custom patterns (rocks, cracks, etc.)
Pattern Brush:
• Repeating texture pattern
• Good for consistent texturing across large areas
Component Brush:
• Affects entire landscape chunks
• For large-scale modifications
Falloff Types
Falloff controls how the brush's strength fades from center to edge.
• Soft, natural blend
• Most commonly used
• Best for organic terrain
Linear Falloff:
• Constant, even falloff
• More predictable
Spherical Falloff:
• Weak in center, strong at edges
• Creates ridges and mounds
Tip Falloff:
• Strong in center, weak at edges
• Good for peaks and spikes
Exercise: Create & Sculpt Your First Terrain
Let's put it all together! Time to create your first landscape and practice sculpting.
- Create a new Empty Map (File → New Level → Empty Level)
- Switch to Landscape Mode (Shift+2)
- Click Create to make a new landscape with default settings
- Switch to the Sculpt tab
- Select the Sculpt tool and create some hills by clicking and dragging
- Hold Shift and drag to create valleys
- Try the Smooth tool to soften your terrain
- Experiment with the Flatten tool to create a plateau
- Use the Ramp tool to connect two different height areas
- Adjust Brush Size and Tool Strength to see how they affect your sculpting
✅ Tutorial 1 Complete
- You understand what Landscapes are and why they're used
- You can activate Landscape Mode
- You know how to create a new landscape
- You understand Section Size and performance
- You can use Sculpt, Smooth, Flatten, and Ramp tools
- You understand brush shapes and falloff types
- You created and sculpted your first terrain!
Tutorial 2: Landscape Materials & Foliage
⏱️ 25-30 minutes
What Are Landscape Materials?
Landscape Materials allow you to paint multiple textures (grass, dirt, rock, sand) onto your terrain and blend them together seamlessly.
• Regular materials have one texture
• Landscape materials have multiple layers
• You "paint" different textures onto different areas
• The Material Editor blends them automatically
Common Landscape Layers:
• Grass (flat areas)
• Dirt (paths, tracks)
• Rock (cliffs, steep slopes)
• Sand (beaches, deserts)
• Snow (mountain peaks)
The LandscapeLayerBlend Node
The secret to landscape materials is a special node called LandscapeLayerBlend.
• Takes multiple texture inputs (layers)
• Allows you to paint which texture appears where
• Blends between textures smoothly
• Connects directly to Base Color (or Normal Map, etc.)
Creating a Landscape Material:
1. Create new Material in Content Browser
2. Open Material Editor
3. Add LandscapeLayerBlend node
4. Add layers (grass, dirt, rock, etc.)
5. Connect texture samples to each layer
6. Connect output to Base Color
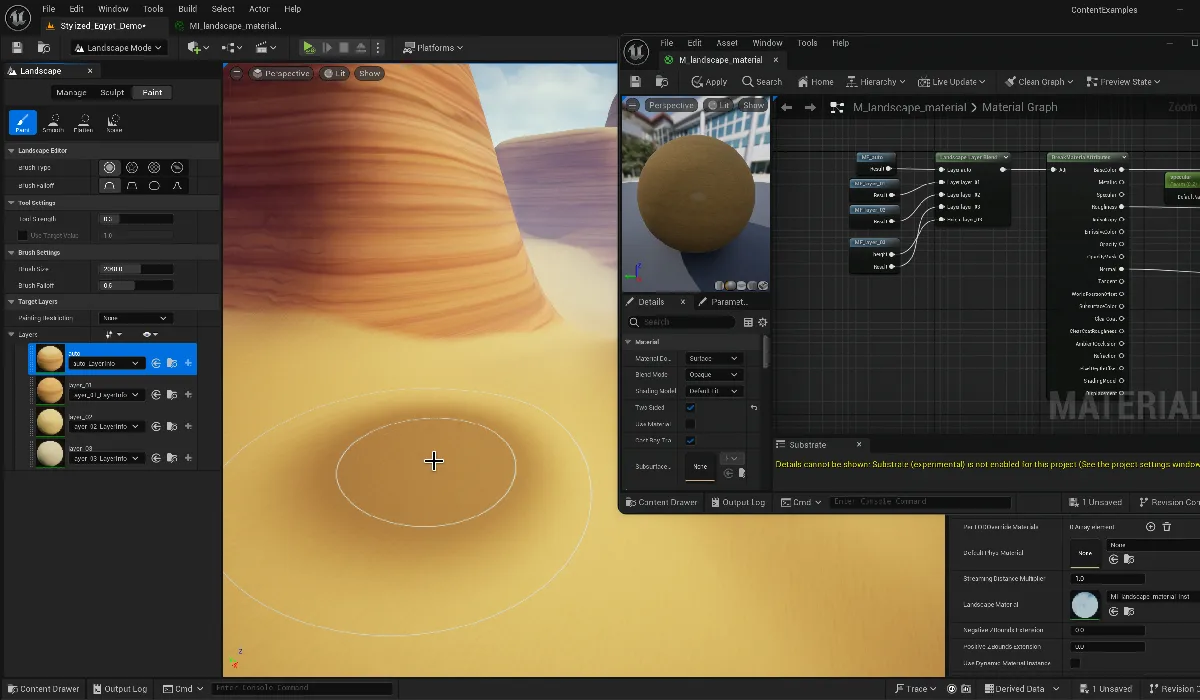
Applying & Painting Landscape Materials
Once you have a landscape material, you can apply it to your terrain and paint different layers.
1. Select your Landscape in the viewport
2. In Details panel, find Landscape Material
3. Assign your material
4. Switch to the Paint tab in Landscape Mode
To Paint Textures:
1. In Paint tab, you'll see your material's layers
2. Select a layer (e.g., "Grass")
3. Left Click + Drag to paint that texture
4. Shift + Left Click + Drag to erase
5. Adjust Brush Size and Strength as needed
Exercise: Apply & Paint Materials
Practice painting textures on your landscape to bring it to life!
- Find a landscape material in Starter Content (or create a simple one)
- Apply the material to your landscape
- Switch to the Paint tab in Landscape Mode
- Paint different textures on different areas:
- Grass on flat areas and gentle slopes
- Dirt on paths or disturbed ground
- Rock on steep cliffs and mountain sides
- Experiment with different Brush Sizes (large for big areas, small for details)
- Try lowering Tool Strength for subtle blending
What is Foliage?
Foliage is Unreal's system for painting vegetation (trees, bushes, rocks, grass) across your landscape efficiently.
• Place thousands of objects quickly
• Automatic random rotation and scaling
• Highly optimized for performance (instancing)
• Align to landscape surface automatically
Common Foliage Objects:
• Trees (pines, oaks, palms)
• Bushes and shrubs
• Grass clumps
• Rocks and boulders
• Flowers and plants
• Debris (sticks, leaves)
Activating Foliage Mode
Foliage has its own dedicated mode, separate from Landscape Mode.
1. Click Selection Mode dropdown
2. Select Foliage (or press Shift+3)
3. The Foliage panel appears
Adding Foliage Types:
1. Click the + Add button
2. Browse for Static Meshes (trees, rocks, etc.)
3. Select multiple meshes to add at once
4. They appear in your Foliage palette
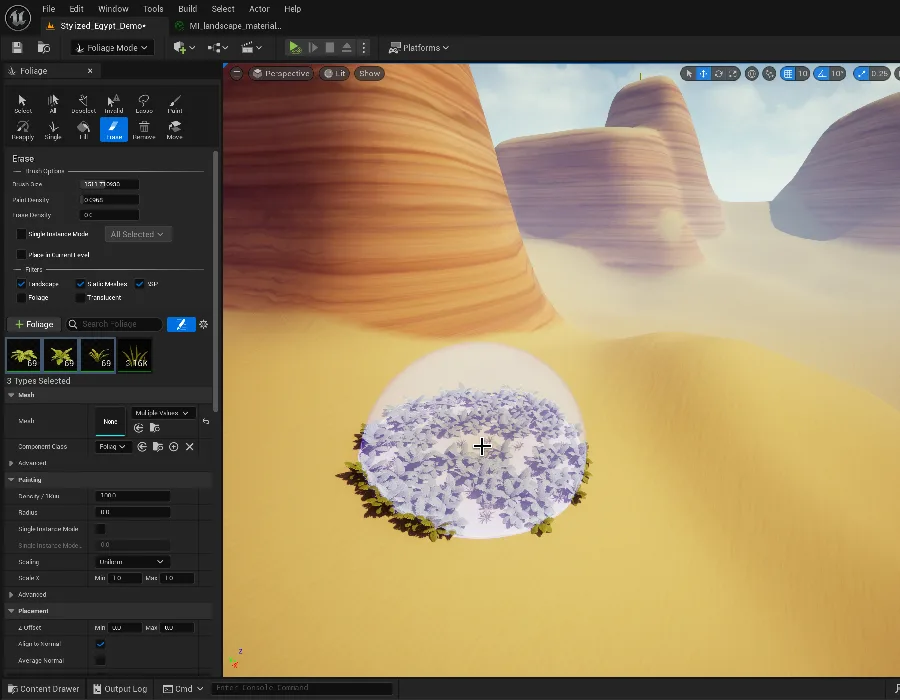
Foliage Tools
The Foliage panel has several tools for placing vegetation. The Paint tool is most common.
• Left Click + Drag = Paint foliage
• Shift + Left Click + Drag = Erase foliage
• Ctrl + Left Click + Drag = Reapply settings to existing foliage
Other Tools:
Reapply - Update all placed foliage with new settings
Select - Select specific foliage instances
Lasso - Select foliage by drawing a shape
Fill - Automatically fill entire areas
Foliage Settings: Random Variation
The power of foliage is in its settings. You can add realistic randomness so every tree looks unique!
Scale:
• Min/Max scale (e.g., 0.8 to 1.2)
• Trees won't all be identical heights
Rotation:
• Random Yaw (Z-axis rotation)
• Align to Normal (follow surface slope)
Offset:
• Random Height Offset
• Prevents "floating" or "buried" objects
Exercise: Paint a Forest
Time to populate your landscape with vegetation!
- Switch to Foliage Mode (Shift+3)
- Add 3-5 foliage types:
- Trees (look in Starter Content or marketplace assets)
- Bushes or shrubs
- Rocks or boulders
- Select a tree mesh and paint a small forest on your landscape
- Experiment with Brush Size and Paint Density
- Select the mesh, scroll down to settings, and enable:
- Random Yaw (under Rotation)
- Align to Normal (under Rotation)
- Scale variation: Min = 0.8, Max = 1.2
- Use Reapply tool to update existing trees with new settings
- Add bushes around tree bases
- Scatter some rocks for natural variety
✅ Tutorial 2 Complete
- You understand landscape materials and layer blending
- You know about the LandscapeLayerBlend node
- You can apply and paint landscape materials
- You understand the Foliage system
- You can add and paint foliage on your landscape
- You know how to use random variation settings
- You created a textured, vegetated environment!
Tutorial 3: Post Process & Cinematic Effects
⏱️ 20-25 minutes
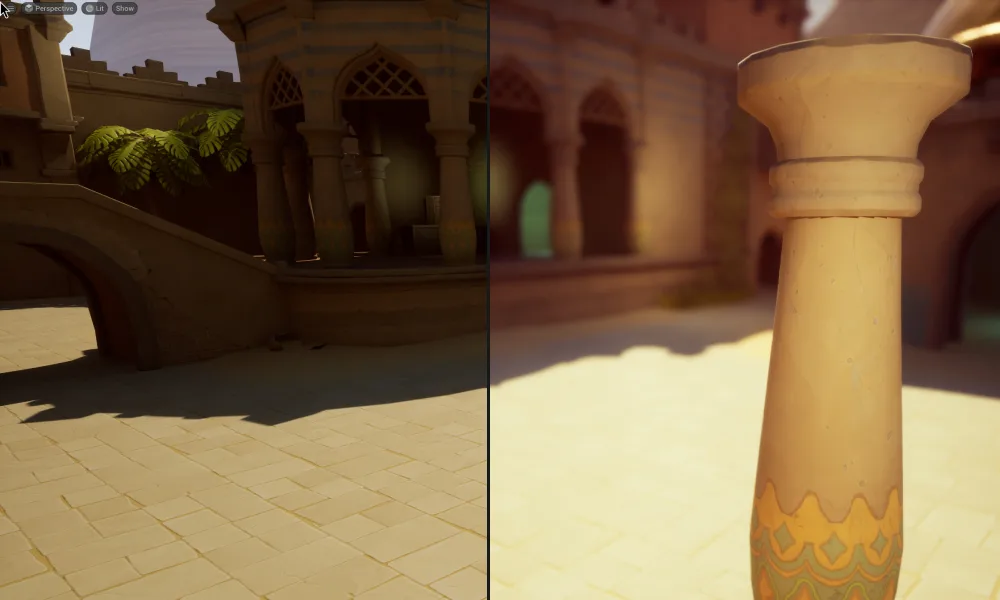
What is Post Processing?
Post Processing refers to visual effects applied AFTER the scene is rendered. Think of it like Instagram filters for your game!
• Color grading and tone (warm vs cool, saturated vs desaturated)
• Depth of field (cinematic camera blur)
• Motion blur (when camera or objects move)
• Bloom (glow around bright objects)
• Lens flares and camera artifacts
• Vignette (darkening at screen edges)
• Film grain and chromatic aberration
Common Moods:
Horror - Desaturated, high contrast, dark vignette
Fantasy - High saturation, vibrant colors, bloom
Realistic - Neutral colors, subtle effects
Sci-Fi - Cool blue tints, chromatic aberration
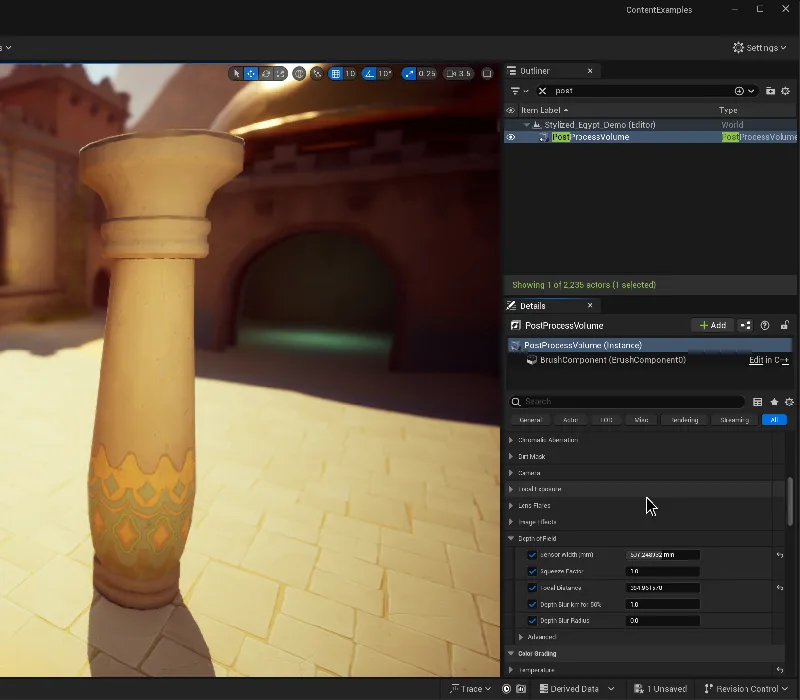
Post Process Volumes
A Post Process Volume is an invisible box that applies effects when the camera enters it.
1. Open Modes panel (Shift+1 for Selection Mode)
2. Search for "Post Process Volume" or find in Visual Effects
3. Drag into your level
4. Select it and check the Details panel
Two Ways to Use:
Local Effect - Keep Unbound OFF
• Affects only the area inside the volume box
• Example: Dark cave, underwater zone
Global Effect - Turn Unbound ON
• Affects the entire level
• Most common for overall scene mood
Post Process Volume Settings
Understanding the key settings helps you control how effects blend together.
Priority (default: 0)
• When multiple volumes overlap, highest priority wins
• Use 1, 2, 3 for layering effects
Blend Radius (default: 100)
• Distance in cm where effect fades in/out
• Larger = smoother, gradual transition
• Smaller = sharper, sudden transition
Blend Weight (default: 1.0)
• 0 = No effect
• 1 = Full effect
• Use 0.5 for subtle, half-strength effects
Enabled (checkbox)
• Turn volume on/off quickly for testing
Unbound (checkbox)
• ON = Affects entire world
• OFF = Only affects area inside volume
Color Grading Basics
Color Grading is the most impactful post process effect. It controls the overall mood and tone of your scene.
Select Post Process Volume → Details Panel → Color Grading category
Key Properties:
Temperature (-100 to +100)
• Negative = Cool (blue tint) - night, winter, sci-fi
• Positive = Warm (orange tint) - sunset, desert, cozy
Tint (-100 to +100)
• Negative = Green tint
• Positive = Magenta tint
Saturation (0 to 2+)
• 0 = Black and white
• 1 = Normal colors
• 2+ = Super vibrant, stylized look
Contrast (0 to 2+)
• <1 = Washed out, hazy
• 1 = Normal
• >1 = Punchy, dramatic
• Warm Sunset: Temperature +50, Saturation 1.1
• Cold Winter: Temperature -40, Tint -10, Saturation 0.9
• Apocalyptic: Saturation 0.7, Contrast 1.2, Tint +15
Other Useful Effects
Beyond color grading, here are other effects worth exploring:
• Makes bright objects glow
• Find in: Lens → Bloom
• Intensity: 0.5 - 2.0 (subtle to strong)
Vignette:
• Darkens screen edges (focuses attention on center)
• Find in: Lens → Image Effects → Vignette Intensity
• Try: 0.4 for subtle effect
Depth of Field:
• Blurs background (cinematic effect)
• Find in: Lens → Depth of Field
• Requires camera setup (advanced)
Motion Blur:
• Blurs fast-moving objects
• Find in: Rendering Features → Motion Blur
• Amount: 0.5 (default is good)
Exercise: Set the Mood with Post Processing
Practice creating different moods by adjusting post process settings!
- Add a Post Process Volume to your level
- Select it and in Details panel, enable Unbound (under Post Process Volume Settings)
- Expand the Color Grading category
- Try creating these moods:
- Warm Afternoon: Temperature +30, Saturation 1.1, Bloom 0.7
- Cold Winter: Temperature -50, Saturation 0.8, Tint -5
- Gloomy Overcast: Saturation 0.7, Contrast 0.9, Vignette 0.3
- Vibrant Fantasy: Saturation 1.3, Bloom 1.2, Contrast 1.1
- Experiment with Bloom Intensity (Lens → Bloom)
- Try adding Vignette (Lens → Image Effects)
- Find a look you like and remember the settings!
✅ Tutorial 3 Complete
- You understand what post processing is
- You can add and configure Post Process Volumes
- You know the difference between Unbound and local volumes
- You understand Priority, Blend Radius, and Blend Weight
- You can use Color Grading to set mood
- You know about Bloom, Vignette, and other effects
- You created several different atmospheric looks!
Tutorial 4: Complete World Setup
⏱️ 30-35 minutes
The Essential Level Actors
When you create an Empty Level, it's completely dark! You need to add several actors to make it playable. Let's understand what each one does.
1. Directional Light (The Sun)
• Main light source for outdoor scenes
• Controls time of day (angle = sun position)
• Should be Stationary mobility
2. Sky Light (Ambient Light)
• Captures sky color and distributes it as ambient light
• Fills in shadows so they're not pitch black
• Real-time or baked
3. Sky Atmosphere (The Sky)
• Creates realistic sky and sunset colors
• Automatically works with Directional Light
• Makes the sky blue during day, orange at sunset
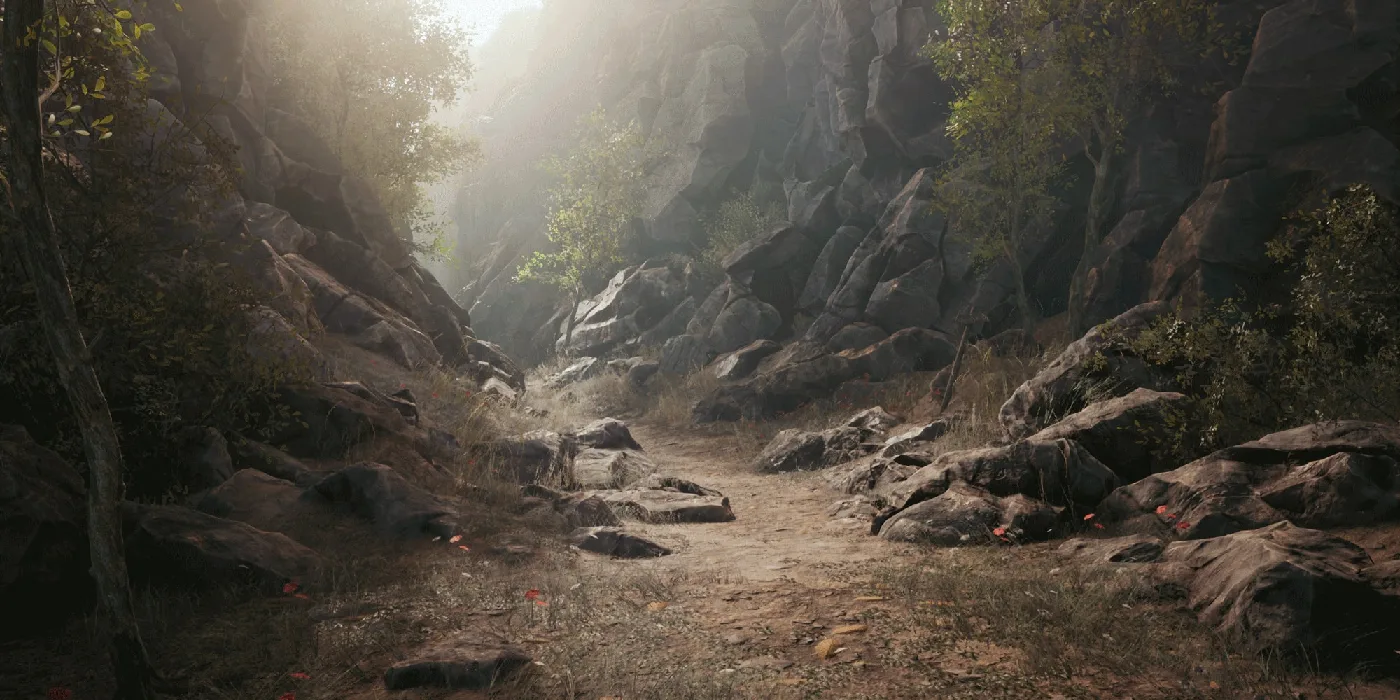
4. Exponential Height Fog (Atmospheric Haze)
• Creates distance fog for depth and atmosphere
• Makes far objects fade into haze
• Supports volumetric fog (god rays!)
5. Volumetric Cloud (Realistic Clouds)
• Dynamic, realistic cloud system
• Optional but adds polish
• Can be animated
Directional Light (The Sun)
The Directional Light represents the sun or moon. Its rotation controls time of day!
Intensity (lux)
• Midday Sun: 100,000 - 120,000
• Morning/Evening: 30,000 - 60,000
• Moonlight: 0.1 - 1.0
Light Color / Temperature
• Enable "Use Temperature"
• Midday: 6500K (white)
• Sunset: 3000K (warm orange)
• Moonlight: 9000K (cool blue)
Rotation (Time of Day)
• Rotation X = -90° → Sun directly overhead (noon)
• Rotation X = -10° → Low sun (sunset/sunrise)
• Rotation X = +10° → Sun below horizon (night)
Sky Light (Ambient Filling)
Sky Light provides soft ambient light to fill in shadows and make the scene feel more natural.
Intensity
• Day: 1.0 (default)
• Night: 0.2 - 0.4 (dim ambient moon glow)
Real Time Capture
• ON = Updates every frame (dynamic sky)
• OFF = Baked once (better performance)
Light Color
• Usually leave white (it captures sky color automatically)
• Can tint blue for extra cool feel
Exponential Height Fog (Atmosphere)
Fog adds depth and atmosphere. It makes distant mountains fade into haze like real life.
Fog Density
• 0.005 = Light haze (clear day)
• 0.02 = Medium fog (overcast)
• 0.1+ = Thick fog (spooky/horror)
Fog Height Falloff
• How quickly fog dissipates with altitude
• 0.2 = Fog high up in mountains
• 2.0 = Fog only in valleys
Volumetric Fog
• Enable for god rays and light shafts
• More expensive but looks amazing
• Scattering Distribution: 0.2 - 0.6
Putting It All Together
The magic happens when all these systems work together. Lighting affects materials, fog interacts with lights, post process ties it all together!
1. Build the Landscape
→ Create terrain with interesting height variation
2. Add Core Actors
→ Directional Light, Sky Light, Sky Atmosphere, Fog
3. Set Time of Day
→ Rotate Directional Light, adjust temperature
4. Apply Materials
→ Paint grass, dirt, rock textures
5. Paint Foliage
→ Add trees, bushes, rocks for life
6. Adjust Fog/Atmosphere
→ Fine-tune fog density, height falloff
7. Color Grade
→ Post Process Volume for final mood
Final Exercise: Build a Complete World
This is it! Combine everything you've learned to create a beautiful, atmospheric game environment.
- Foundation:
- Create a new Empty Level
- Add the 5 core actors (or use Environment Light Mixer)
- Create a landscape with varied terrain
- Choose Your Mood (pick one):
- Bright Day: Sun at -70°, Temp 6500K, Light fog
- Golden Hour: Sun at -15°, Temp 3000K, Warm post process
- Overcast: Sun at -45°, Low intensity, Medium fog, Desaturated
- Moonlit Night: Sun at +10°, Very low intensity, Cool blue tint
- Set Up Lighting:
- Adjust Directional Light angle and temperature for your chosen mood
- Set Sky Light intensity appropriately
- Add Atmosphere:
- Configure Exponential Height Fog density
- Try enabling Volumetric Fog for god rays
- Texture Your Landscape:
- Apply a landscape material
- Paint grass, dirt, and rock textures logically
- Populate with Foliage:
- Add trees, bushes, and rocks
- Use random variation for realism
- Don't overdo it - check performance!
- Final Polish:
- Add Post Process Volume (Unbound = true)
- Color grade to match your mood
- Add subtle bloom and vignette
- Test and Iterate:
- Press Play and walk through your level
- Adjust what doesn't feel right
- Check frame rate - optimize if needed
✅ Tutorial 4 Complete - You're a World Builder!
- You understand all 5 core level actors
- You can configure Directional Light for different times of day
- You know how to use Sky Light and Sky Atmosphere
- You can add and configure Exponential Height Fog
- You understand the complete world-building workflow
- You can combine lighting, fog, materials, foliage, and post process
- You created a complete, atmospheric game environment!
🎉 Congratulations!
You've completed the Landscapes & World Building tutorial! You now have the skills to create beautiful, expansive outdoor environments in Unreal Engine.
What's Next?
- Experiment with different biomes (desert, snow, alien planets)
- Learn about water systems for lakes and oceans
- Explore procedural foliage for automatic forest generation
- Study real-world landscapes for inspiration
- Build levels for actual gameplay (cover, paths, exploration)
Remember: Great environments tell stories without words. Your landscape IS a character in your game!