Lighting & Rendering in Unreal Engine
A Complete Beginner's Guide to Creating Professional Lighting
Lighting transforms your game from dull to dramatic, flat to photorealistic. This tutorial will teach you everything you need to know to create professional lighting in Unreal Engine, even if you've never worked with 3D lighting before.
What You'll Learn
💡 Lighting Fundamentals
Understand how light works in Unreal and the terminology used by professionals
🔦 Light Types & Properties
Master the 5 main light types and how to control their appearance
⚡ Performance & Workflow
Learn mobility settings, optimization, and professional lighting workflows
Tutorial Topics (Click to Jump)
Topic 1: Introduction to Lighting
⏱️ 15-20 minutes
Lighting terminology, direct vs indirect lighting, shadows, attenuation
Topic 2: Light Types
⏱️ 20-25 minutes
Directional, Point, Spot, Rect, and Sky lights - when to use each
Topic 3: Light Properties
⏱️ 25-30 minutes
Intensity, color, attenuation, shadows, temperature, and more
Topic 4: Mobility Settings
⏱️ 20-25 minutes
Static, Stationary, Movable - performance and quality tradeoffs
Topic 5: Practical Lighting Workflow
⏱️ 25-30 minutes
Environment Light Mixer, volumetric fog, creating atmosphere
Tutorial 1: Introduction to Lighting
⏱️ 15-20 minutes
Why Lighting Matters
Lighting is one of the most powerful tools in game development. It sets the mood, guides the player's eye, makes surfaces look realistic, and can turn a simple scene into something breathtaking. In Unreal Engine, you work with Light Actors - objects that emit light just like lamps in the real world.
Direct Lighting
Direct lighting is light that travels straight from a light source to a surface without bouncing off anything first. This is the primary, strongest light that hits your objects.
Light Source → Surface
Characteristics:
• Brightest light on the surface
• Full color of the light source
• Creates the main shadow
• Most performance-friendly
Indirect (Bounced) Lighting
Indirect lighting is light that bounces off other surfaces before reaching an object. This is what fills in shadows and makes scenes look realistic instead of flat.
Light Source → Surface A → Surface B
Characteristics:
• Softer, more subtle than direct light
• Takes on color from surfaces it bounces off
• Fills in dark areas (ambient lighting)
• More expensive to calculate
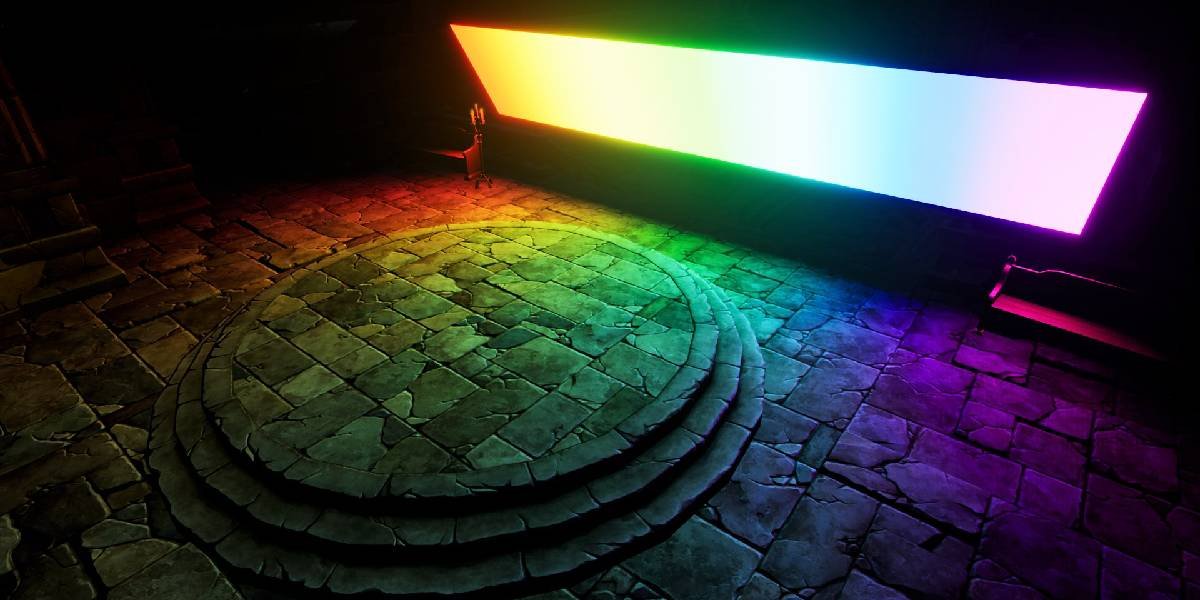
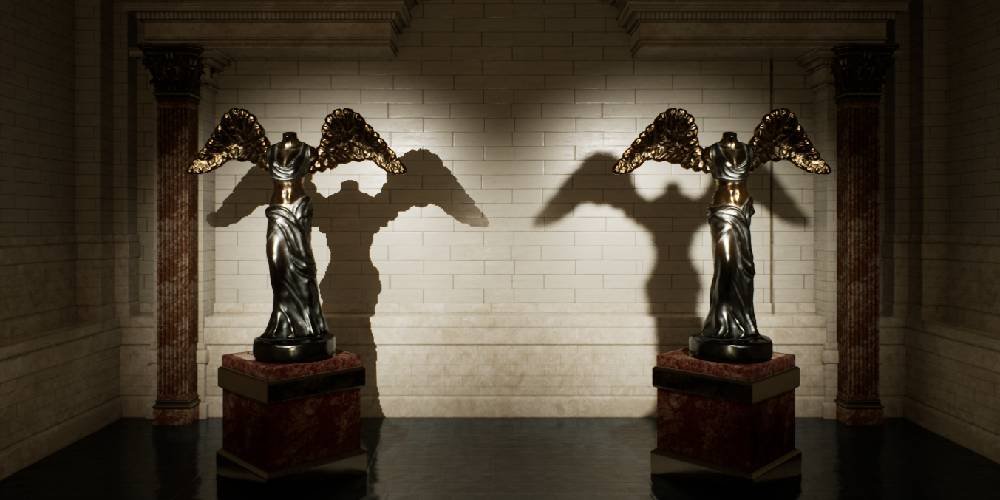
Understanding Shadows
Shadows are areas where light is blocked by an object. Unreal creates shadows by taking a "snapshot" of the scene from the light's point of view and projecting it onto surfaces.
Hard Shadows = Sharp edges (small/distant light source)
Soft Shadows = Blurred edges (large/close light source)
Contact Shadows = Extra detail where objects meet
Static vs Dynamic Lighting
This is one of the most important concepts in Unreal Engine lighting:
• Calculated once during "Build"
• Saved to textures (lightmaps)
• Cannot move or change at runtime
• High quality, great performance
Dynamic (Movable) Lighting:
• Calculated every frame in real-time
• Can move, change color, turn on/off
• More expensive performance-wise
• Essential for moving lights (flashlight, etc.)
Light Attenuation
Attenuation is the fancy word for "light gets dimmer the further it travels." Just like real life, lights in Unreal don't shine forever - they fade out over distance.
• Defines how far the light reaches
• Light is brightest at the source
• Fades to zero at the edge of the radius
• Larger radius = more expensive performance
✅ Tutorial 1 Complete
- You understand what Light Actors are and why lighting is important
- You know the difference between direct and indirect lighting
- You understand how shadows work in Unreal
- You know the difference between static and dynamic lighting
- You understand light attenuation
Tutorial 2: Light Types
⏱️ 20-25 minutes
The Five Main Light Types
Unreal Engine provides five types of lights, each designed for different purposes. Think of them like different tools in a toolbox - you need the right one for the job.
1. Directional Light - Simulates the sun (parallel rays)
2. Point Light - Emits in all directions (light bulb)
3. Spot Light - Emits in a cone (flashlight, lamp)
4. Rect Light - Area light with shape (window, monitor)
5. Sky Light - Captures environment for ambient light
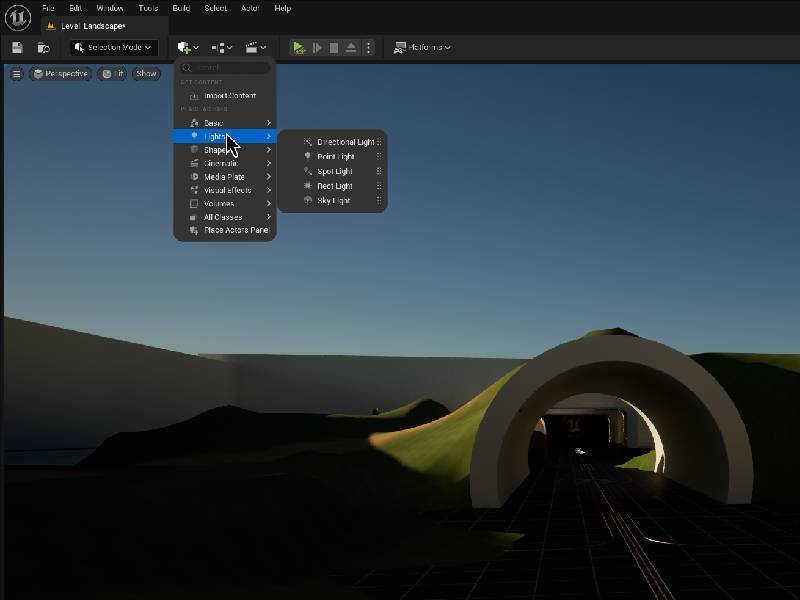
Placing Lights in Your Scene
Before we explore each light type, let's learn how to add them:
- In the toolbar, click the Place Actors panel (or press Shift+1)
- Navigate to Lights category
- You'll see all five light types listed
- Drag a light into your viewport to place it
- Use the Move tool (W key) to position it
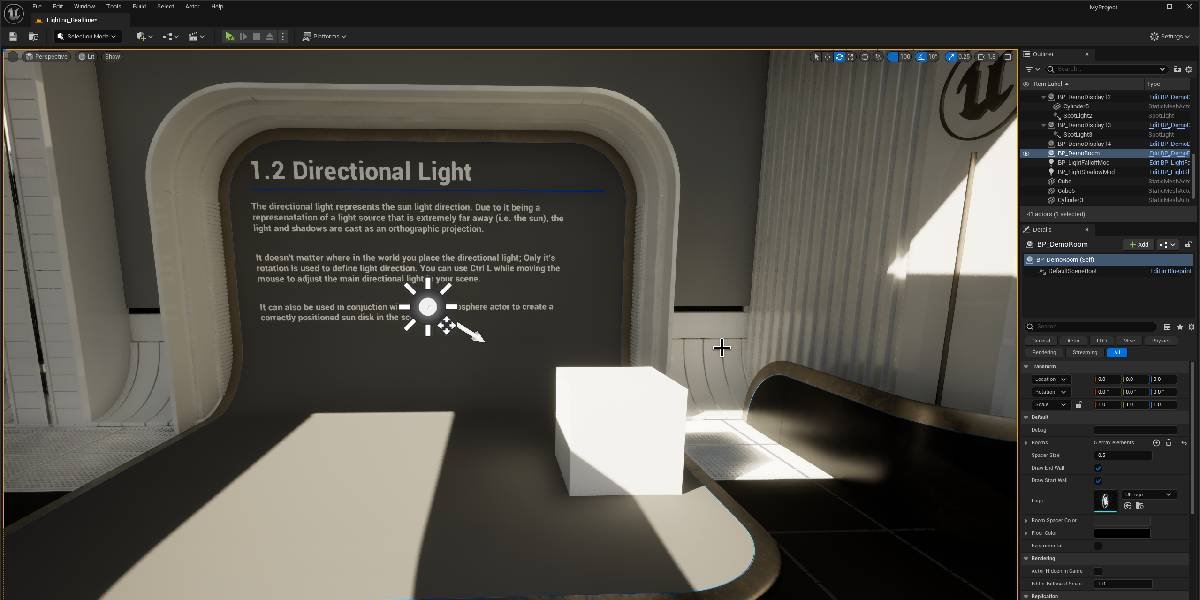
Directional Light
The Directional Light simulates a massive, distant light source like the sun. All light rays are parallel, and it affects the entire level equally.
• The sun or moon
• Primary outdoor lighting
• Skylight during daytime
Key Features:
• Position doesn't matter, only rotation
• Covers infinite distance
• Usually only need one per level
• Can cast shadows across the entire scene
Point Light
A Point Light emits light in all directions from a single point, just like a light bulb hanging from the ceiling.
• Light bulbs
• Candles or torches
• Explosions or magic effects
• Small area lighting
Key Features:
• Emits in a sphere
• Position is very important
• Has attenuation radius
• Can be moved and animated

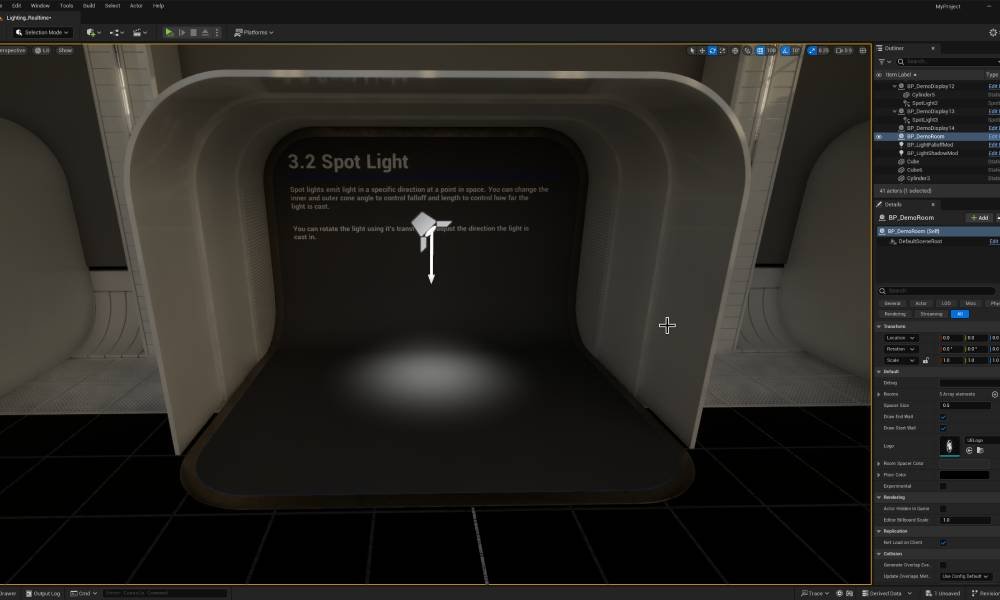
Spot Light
A Spot Light emits light in a cone shape, perfect for focused lighting like a flashlight or stage light.
• Flashlights
• Street lamps
• Ceiling spotlights
• Car headlights
• Stage lighting
Key Features:
• Emits in a cone
• Both position AND rotation matter
• Has inner and outer cone angles
• Great for focused lighting
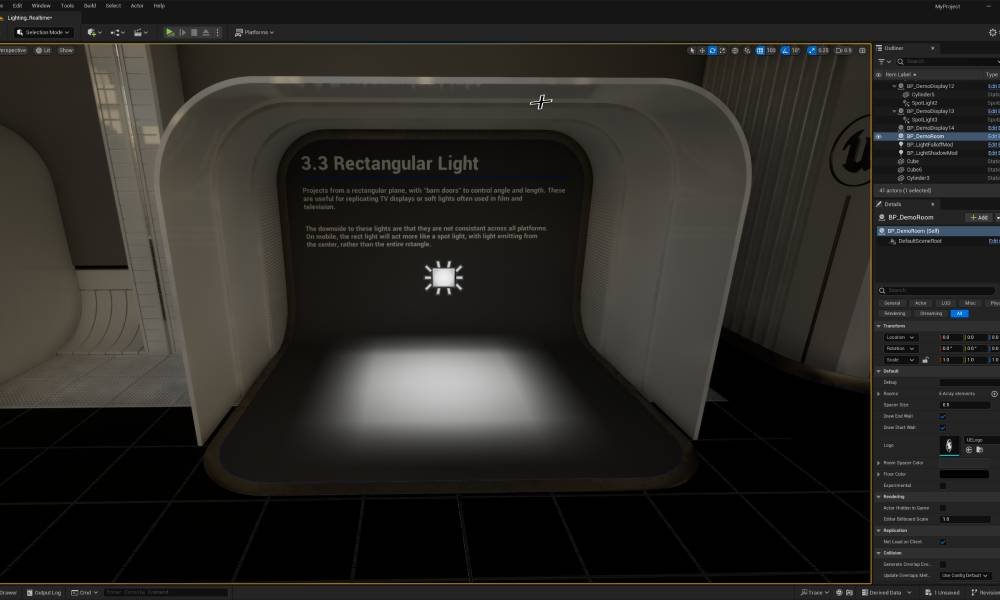
Rect Light
A Rect Light (Rectangle Light) is an area light with width and height, giving more realistic lighting from surfaces.
• TV/monitor screens
• Windows
• Light panels
• Photography softboxes
Key Features:
• Has physical width and height
• Creates softer, more realistic shadows
• More expensive than point/spot lights
• Great for architectural lighting
Sky Light
The Sky Light captures the scene around it and uses it to provide ambient lighting - like how the sky provides overall light outdoors.
• Outdoor ambient lighting
• Image-based lighting
• Filling in shadows
• Creating realistic outdoor scenes
Key Features:
• Provides ambient light from all directions
• Can use cubemap or capture scene
• Usually only need one per level
• Essential for outdoor scenes
Exercise: Place Each Light Type
Let's practice placing and experimenting with each light type:
- Create a new Basic level (File → New Level → Basic)
- Place a Directional Light and rotate it to light the scene from above
- Place a few cubes or spheres as test objects
- Add a Point Light near one object - see how it lights in all directions
- Add a Spot Light and rotate it to point at an object - notice the cone
- Add a Rect Light and adjust its size - see how shadows soften
- Add a Sky Light - notice how shadows fill in with ambient light
✅ Tutorial 2 Complete
- You know all five light types in Unreal Engine
- You can place lights in your scene
- You understand when to use each light type
- You've experimented with different lights hands-on
Tutorial 3: Light Properties
⏱️ 25-30 minutes
The Details Panel
When you select a light in your scene, the Details Panel (usually on the right) shows all the properties you can adjust. There are many options, but we'll focus on the most important ones.
• Light - Intensity, color, temperature
• Lightmass - Static lighting settings
• Transform - Position, rotation, scale
• Rendering - Shadows, attenuation, advanced
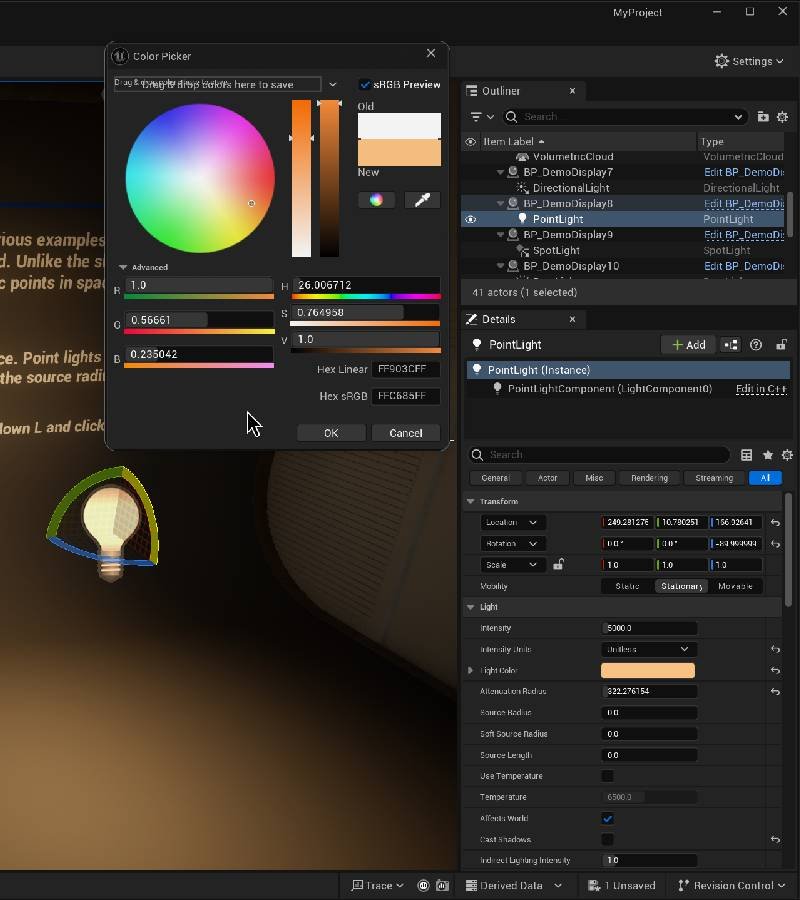
Intensity
Intensity controls how bright the light is. In Unreal, intensity is measured in lumens - the same unit used for real-world light bulbs.
• 100W Incandescent Bulb: ~1,700 lumens
• Candle: ~12 lumens
• 60W LED Bulb: ~800 lumens
• Car Headlight: ~1,200 lumens
• Direct Sunlight: ~120,000 lumens/m²
Common Starting Values:
Point Light (indoor): 1,000 - 5,000
Spot Light: 2,000 - 10,000
Directional Light (sun): 10 - 100
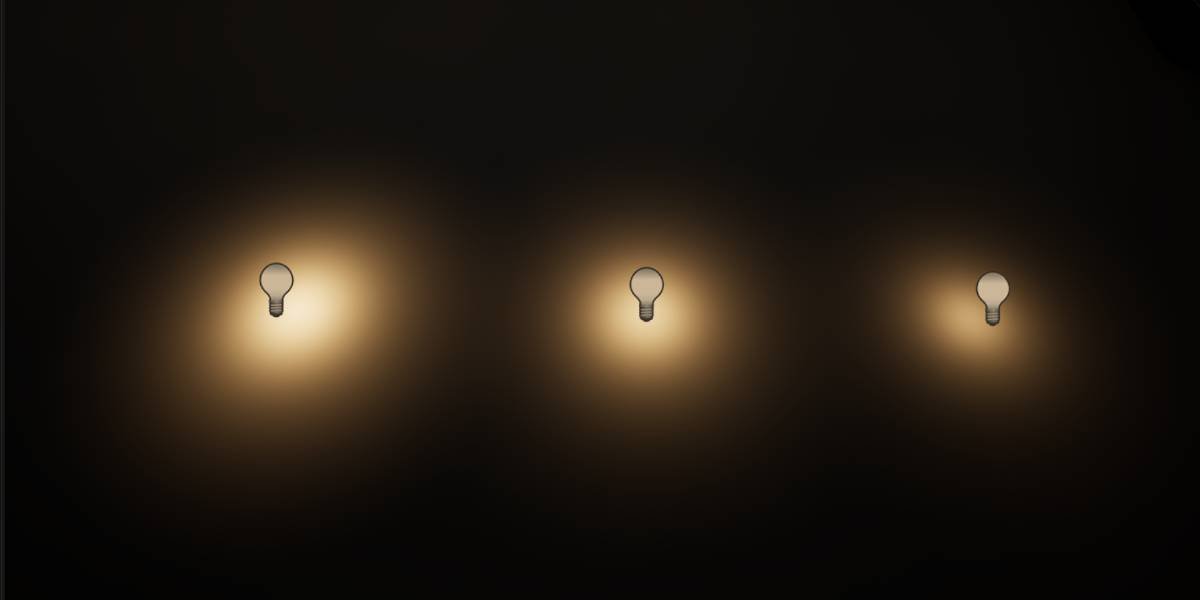
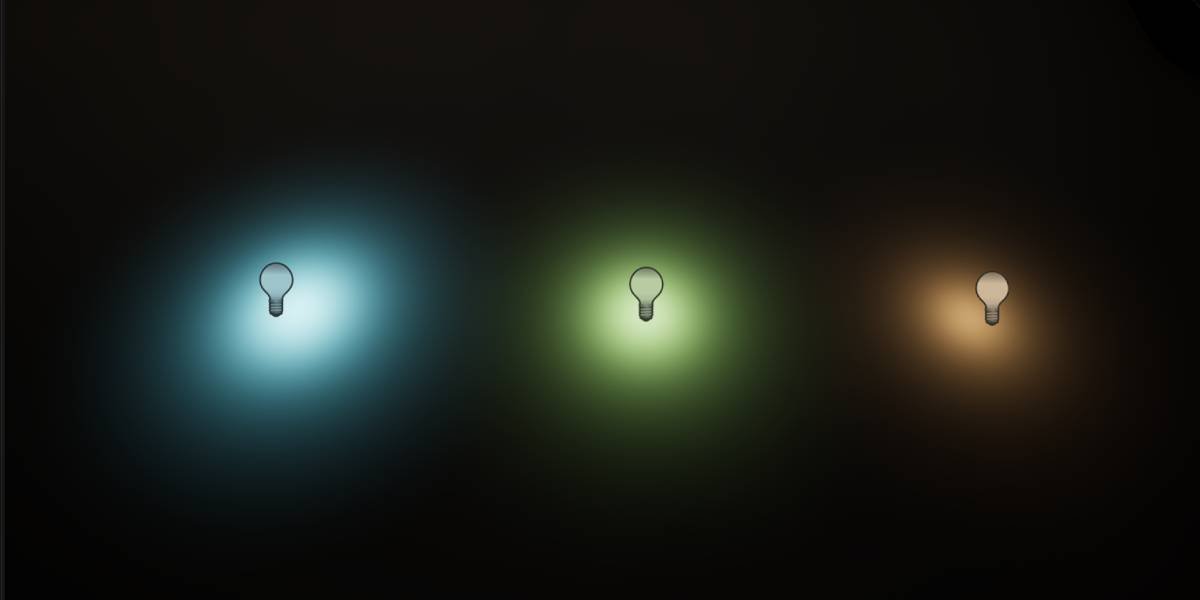
Light Color
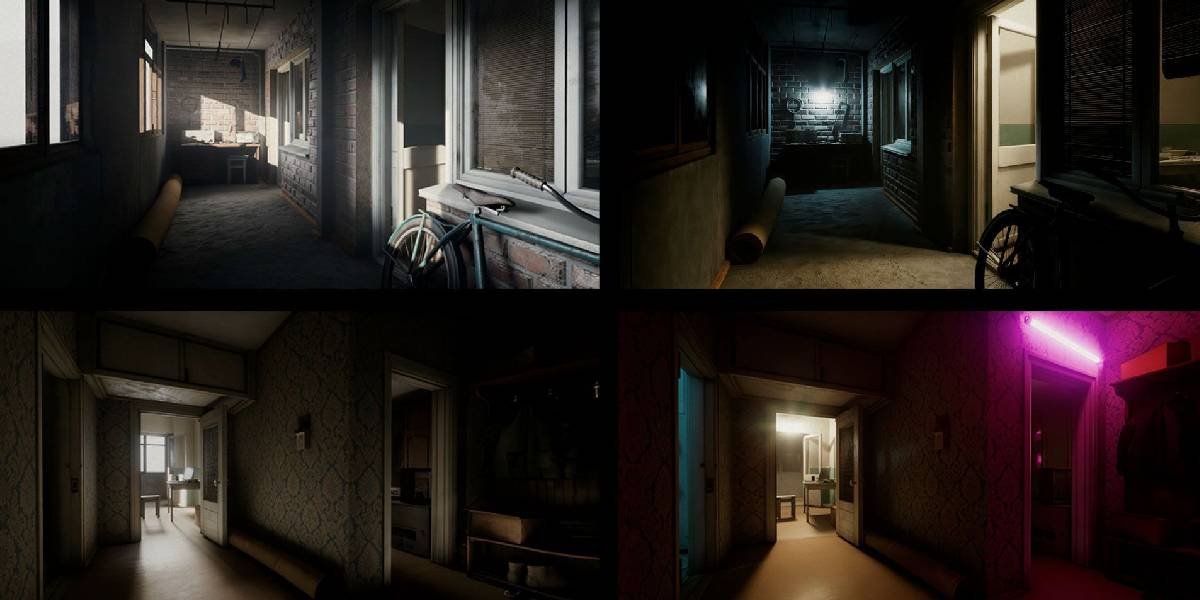
Light Color determines what color the light emits. This is incredibly powerful for setting mood and atmosphere.
Warm (Orange/Yellow) - Sunset, cozy, fire, lamps
Cool (Blue/Cyan) - Night, technological, moonlight
Green - Toxic, alien, mysterious
Red - Danger, hell, emergency
White - Neutral, daytime, clean
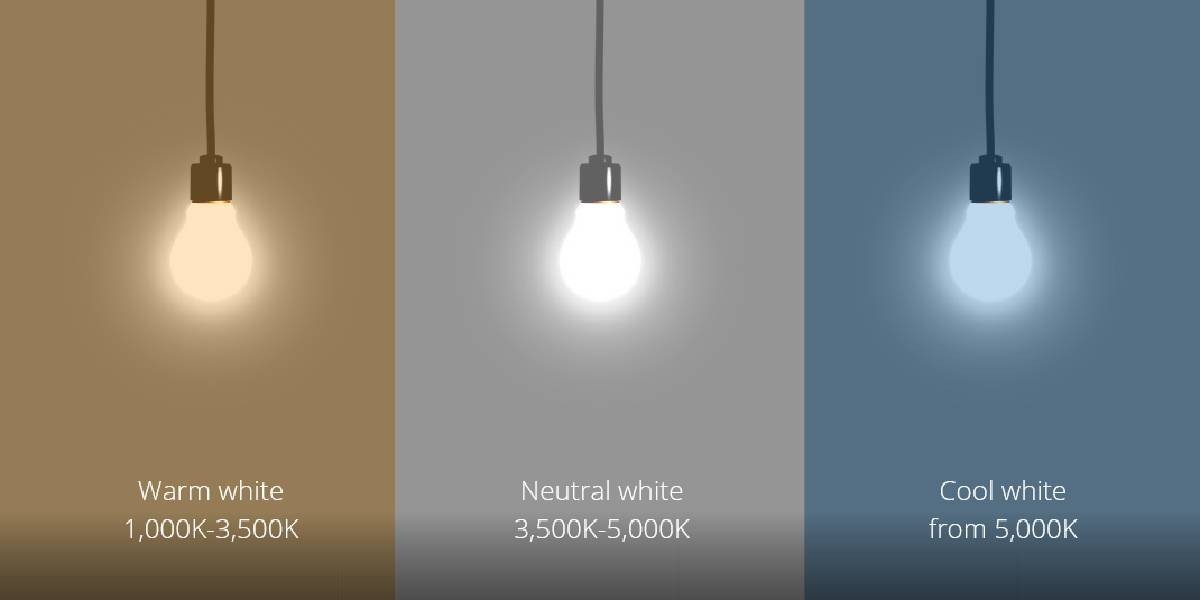
Temperature
Temperature lets you set light color based on the Kelvin scale - the same system photographers use. This is perfect for realistic lighting!
1,700K - Match flame (very warm orange)
2,700K - Incandescent bulb (warm yellow)
4,500K - Fluorescent tube (neutral)
5,500K - Daylight (slightly cool white)
6,500K - Overcast sky (cool white)
9,000K - Blue sky (cool blue)
// To use temperature:
1. Check "Use Temperature" checkbox
2. Adjust Temperature slider in Kelvin
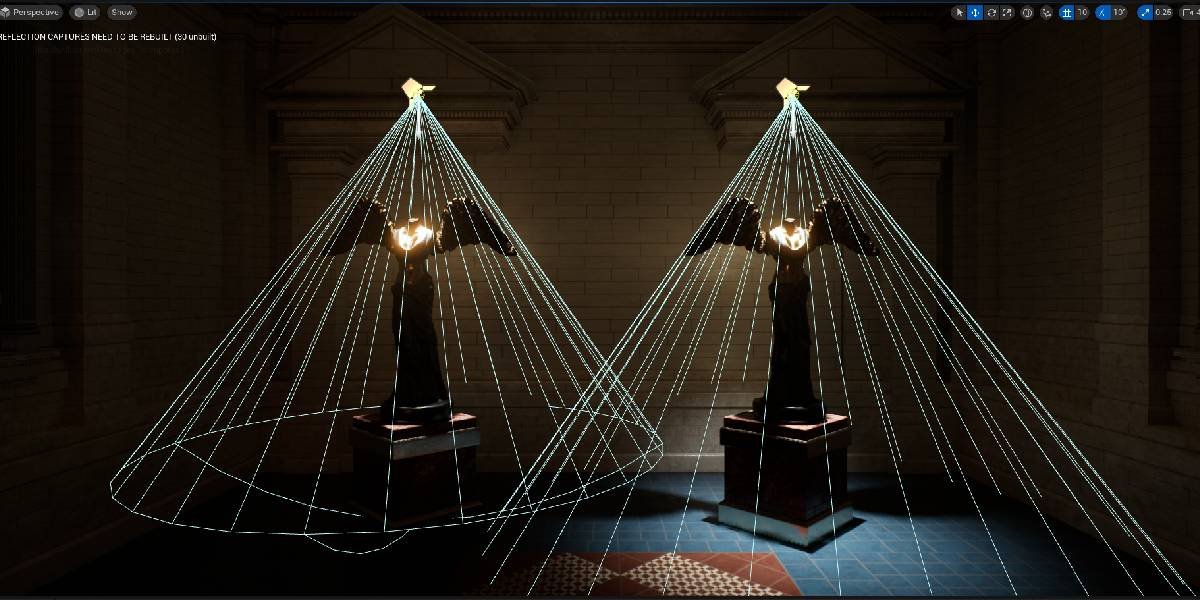
Attenuation Radius
Attenuation Radius defines how far the light reaches before fading to zero. This is critical for performance!
• Light is brightest at the source
• Gradually fades based on inverse square law
• Reaches zero at the edge of the radius
• Visualized as a sphere (Point) or cone (Spot)
Performance Rule:
Smaller radius = Better performance
Larger radius = Affects more pixels = More expensive
Cast Shadows
The Cast Shadows checkbox determines whether this light creates shadows. Shadows are beautiful but expensive!
✓ Realistic depth and form
✓ Objects feel grounded
✓ Better visual quality
✗ More expensive performance
Cast Shadows = OFF:
✓ Much better performance
✓ Good for fill lights
✗ Objects can look flat
✗ Less realistic
Spot Light Cone Angles
Spot Lights have special properties for controlling their cone shape:
• The bright, focused area
• Measured in degrees (0-89)
• Smaller = more focused beam
Outer Cone Angle:
• The falloff area around the bright cone
• Must be larger than inner cone
• Creates soft or hard edge
// Examples:
Flashlight: Inner 10°, Outer 20° (tight beam)
Stage light: Inner 30°, Outer 45° (medium)
Ceiling lamp: Inner 40°, Outer 50° (wide)
Exercise: Create a Moody Scene
Let's practice using light properties to create atmosphere:
- Create a Basic level with some objects (cubes, spheres, etc.)
- Add a Directional Light as your "sun"
- Set Intensity to ~3 (dim/moody)
- Enable "Use Temperature", set to 3,500K (warm sunset)
- Ensure "Cast Shadows" is enabled
- Add a Point Light as an accent light
- Set Intensity to 2,000
- Set color to orange (R: 1.0, G: 0.4, B: 0.1)
- Set Attenuation Radius to 1,500
- Add a Spot Light for dramatic effect
- Point it at your main object
- Inner Cone: 15°, Outer Cone: 30°
- Set color to cool blue
- Experiment! Adjust values and see how they affect the mood
✅ Tutorial 3 Complete
- You understand Intensity and how to set realistic brightness
- You can use Light Color and Temperature to set mood
- You know how Attenuation Radius affects lighting and performance
- You understand when to use Cast Shadows
- You can control Spot Light cone angles
- You created a moody scene using multiple light properties
Tutorial 4: Mobility Settings
⏱️ 20-25 minutes
What is Mobility?
Every light in Unreal has a Mobility setting that tells the engine: "Will this light move or change at runtime?" This setting has a massive impact on both quality and performance.
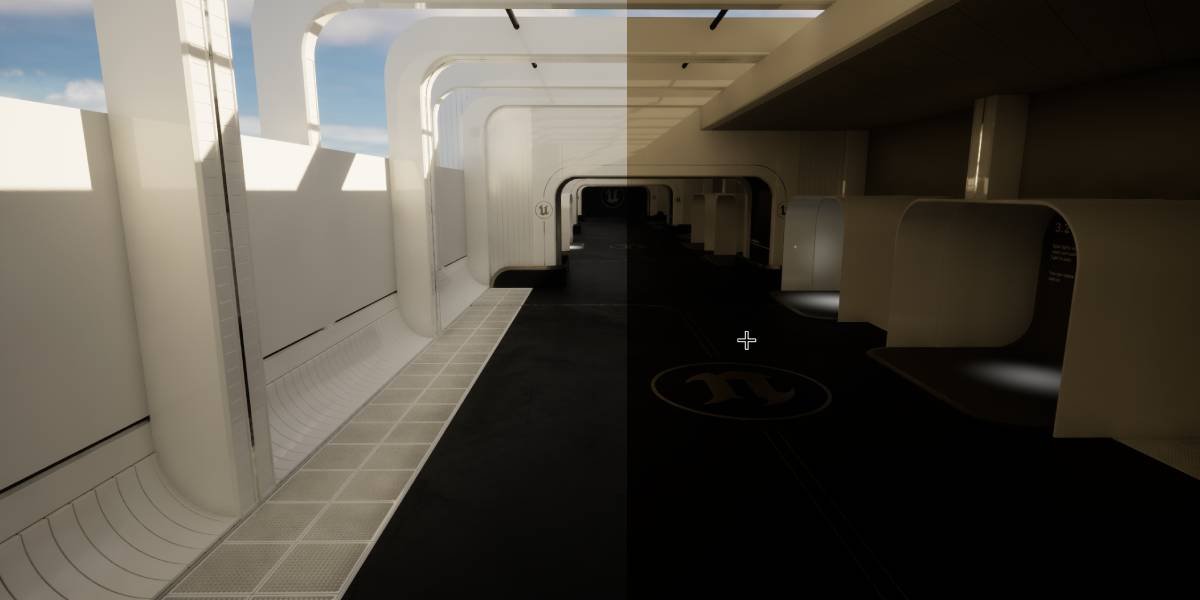
Static - Never moves, baked into lightmaps
Stationary - Can't move, but can change brightness/color
Movable - Can do anything, calculated every frame
Static Mobility
Static lights cannot move or change in any way at runtime. Their lighting is "baked" (pre-calculated) into textures called lightmaps.
✓ Highest quality lighting
✓ Best performance at runtime
✓ Supports indirect lighting (bounces)
✓ Very soft, realistic shadows
Disadvantages:
✗ Cannot move, rotate, or change
✗ Requires "Build Lighting" process
✗ Only works with static objects
✗ Takes up memory (lightmap textures)
Best For:
• Architectural lighting (ceiling lights)
• Sun/moon in non-dynamic day/night games
• Mobile games (performance critical)
Stationary Mobility
Stationary lights are a hybrid: they can't move, but their brightness and color can change at runtime. Think of a light switch.
✓ High quality shadows and lighting
✓ Can change brightness and color
✓ Good performance
✓ Supports some indirect lighting
Disadvantages:
✗ Cannot move or rotate
✗ Limited number per area (overlapping)
✗ Still requires Build Lighting
Best For:
• Lights that turn on/off (switches)
• Lights that change brightness (dimmers)
• Main lighting in most modern games
• Directional lights (sun with day/night)
Movable Mobility
Movable lights are fully dynamic - they can move, rotate, change color, change brightness, or do anything else at runtime.
✓ Complete freedom - can do anything
✓ Can move and rotate
✓ No build time required
✓ Immediate feedback
Disadvantages:
✗ Expensive performance cost
✗ Lower quality shadows than static
✗ No indirect lighting (no bounces)
✗ Can cause performance issues with many lights
Best For:
• Flashlights held by player
• Car headlights
• Projectiles (fireballs, bullets)
• Moving enemies with lights
• Any light that needs to move
Understanding Lightmaps
When you use Static or Stationary lights, Unreal bakes the lighting into special textures called lightmaps. These store pre-calculated lighting information.
• Light intensity at each point
• Shadow information
• Color from colored lights
• Indirect lighting bounces
To Build Lightmaps:
1. Click "Build" in the toolbar
2. Select "Build Lighting Only"
3. Wait for it to complete (can take minutes)
4. Lighting quality improves dramatically
Performance Comparison
Here's a breakdown of how mobility affects performance:
Static - Virtually free at runtime ⚡
Stationary - Low cost at runtime ⚡⚡
Movable - High cost at runtime ⚡⚡⚡⚡⚡
Quality (Low to High):
Movable - Good quality ⭐⭐⭐
Stationary - High quality ⭐⭐⭐⭐
Static - Highest quality ⭐⭐⭐⭐⭐
Flexibility (Low to High):
Static - Cannot change ❌
Stationary - Can change brightness/color 🟡
Movable - Complete freedom ✅
Choosing the Right Mobility
Here's a decision flowchart to help you choose:
// Question 1: Does it need to move?
YES → Use Movable
NO → Continue to Question 2
// Question 2: Does it need to change brightness/color?
YES → Use Stationary
NO → Continue to Question 3
// Question 3: Are you targeting mobile/low-end?
YES → Use Static
NO → Use Stationary (modern default)
Exercise: Test Different Mobility Settings
Let's see the differences firsthand:
- Create three identical Point Lights in your scene
- Set the first to Static, second to Stationary, third to Movable
- Give each a different color so you can tell them apart
- Click Build → Build Lighting Only and wait for it to complete
- Compare the quality - notice how Static looks best
- Now click Play to start the game
- Try to move each light using Blueprint or during gameplay
- Static won't move
- Stationary won't move
- Movable will move freely
✅ Tutorial 4 Complete
- You understand the three Mobility settings
- You know when to use Static, Stationary, and Movable
- You understand lightmaps and building lighting
- You can make informed performance vs quality tradeoffs
- You tested different mobility settings hands-on
Tutorial 5: Practical Lighting Workflow
⏱️ 25-30 minutes
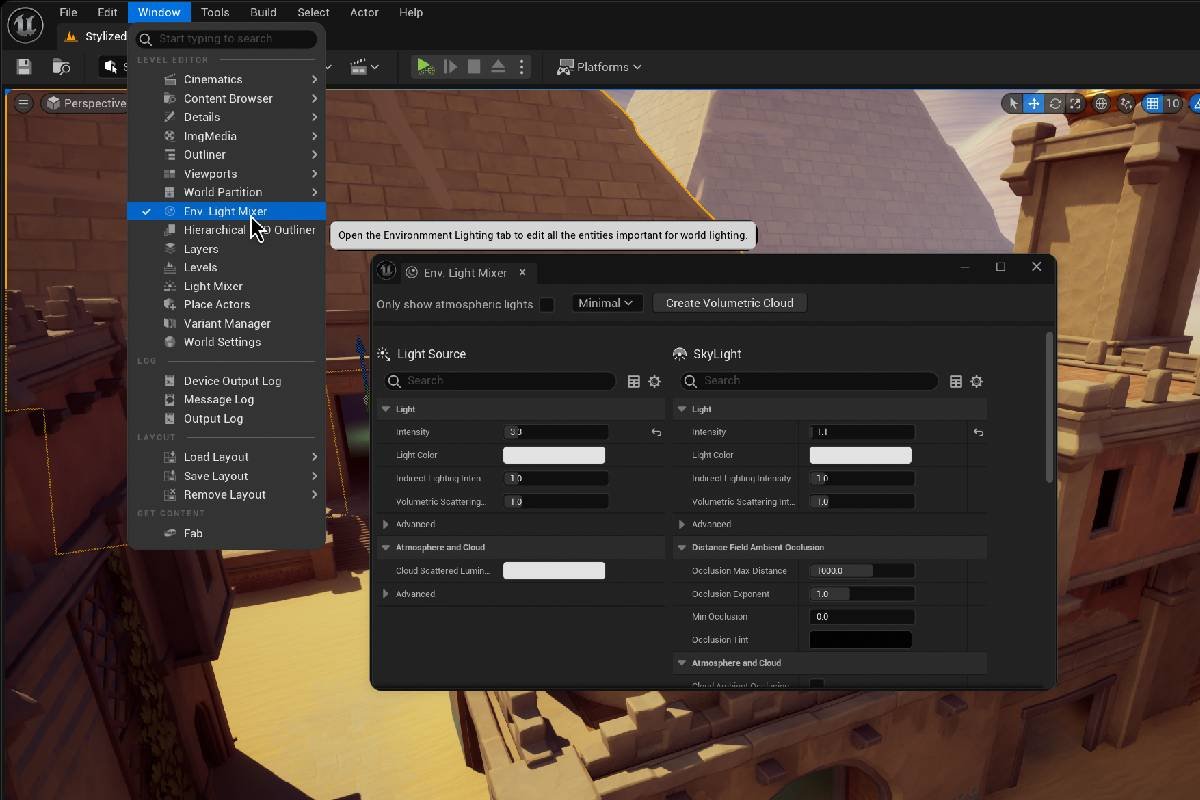
The Environment Light Mixer
The Environment Light Mixer is a powerful tool that lets you quickly set up and control all your main scene lights from one panel. It's like a lighting control board!
Window → Environment Light Mixer
What It Controls:
• Directional Light (sun/moon)
• Sky Light (ambient)
• Sky Atmosphere
• Exponential Height Fog
• All from one convenient panel
Setting Up a Basic Lighting Scenario
Let's create a complete outdoor lighting setup from scratch:
- Create a new Basic level (File → New Level → Basic)
- You'll see it comes with default lighting - we're going to replace it
- In the Outliner, find the Lighting folder
- Delete everything inside (Directional Light, Sky Light, etc.)
- Now open Window → Environment Light Mixer
- Click Create All to add a complete lighting setup
Controlling the Sun
In the Environment Light Mixer, you can control the sun's angle, color, and intensity:
Sun Height Angle - Time of day (0=sunrise, 90=noon)
Sun Brightness - Intensity of sunlight
Sun Direction - Which direction the sun shines from
Try These Settings:
Morning: Height Angle 15°, Warm color
Midday: Height Angle 90°, Bright white
Evening: Height Angle 10°, Orange/red
Night: Height Angle -20°, Use Sky Light only
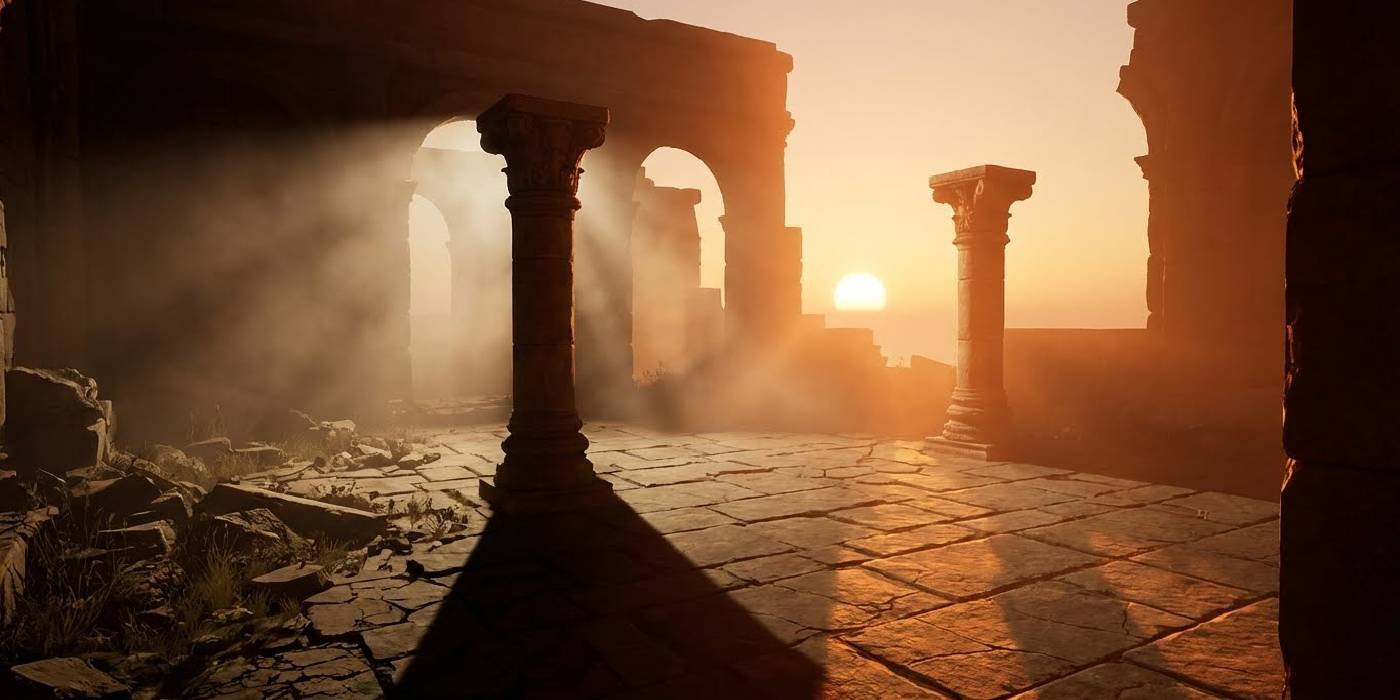
Adding Volumetric Fog
Volumetric Fog adds atmosphere and god rays (light shafts) to your scene. It makes light visible in the air!
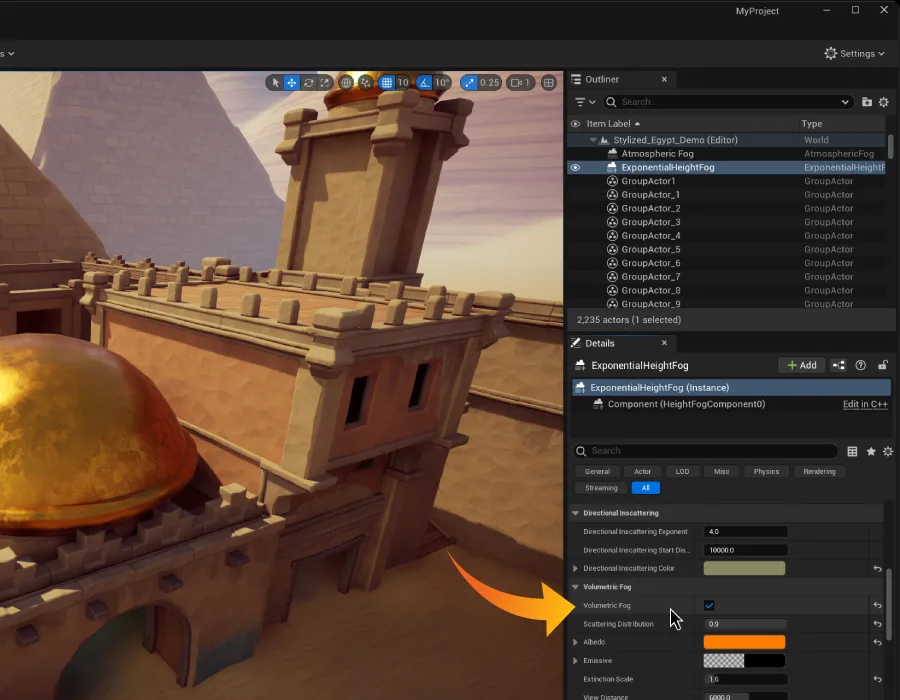
- In the Outliner, find ExponentialHeightFog (created by Env Light Mixer)
- Select it and look at the Details panel
- Find the Volumetric Fog section
- Check the Volumetric Fog checkbox to enable it
- Adjust these settings:
- Scattering Distribution: 0.2 (how light scatters)
- Extinction Scale: 0.5 (fog density)
- Albedo: Keep at 1.0 (fog color)
Controlling Volumetric Scattering on Lights
Individual lights have a Volumetric Scattering Intensity property that controls how much they interact with fog:
1. Select the Directional Light
2. In Details panel, find "Light" section
3. Look for "Volumetric Scattering Intensity"
4. Default is 1.0
Recommended Values:
Sun (day): 1.0 - 2.0 (strong god rays)
Moon (night): 0.2 - 0.5 (subtle rays)
Indoor lights: 0.5 - 1.0 (soft atmosphere)
Creating a Gloomy Atmospheric Scene
Let's put it all together to create a moody, atmospheric environment:
- Set Sun Height Angle to 5° (low, dramatic)
- Set Sun Direction to create long shadows
- Enable Use Temperature on Directional Light, set to 3000K (warm sunset)
- Reduce Sun Brightness to 3-5 (dimmer)
- Enable Volumetric Fog on ExponentialHeightFog
- Set Volumetric Scattering Intensity on Directional Light to 1.5
- Increase Fog Density (Extinction Scale) to 1.0 for more atmosphere
- Add a few Point Lights as accent lights (warm orange color)
Lighting Best Practices
Here are professional tips for lighting your scenes:
Key Light - Main light (brightest, casts shadows)
Fill Light - Fills in shadows (softer, no shadows)
Rim Light - Behind subject (defines edges)
Performance Tips:
• Use as few shadow-casting lights as possible
• Keep attenuation radii small
• Use Stationary for main lights, Movable only when needed
• Don't overlap too many lights
Quality Tips:
• Use colored lights for atmosphere
• Contrast warm and cool lights
• Add volumetric fog for depth
• Study real-world lighting and photography
Final Exercise: Complete Scene Setup
Create a complete lighting setup from the original PDF exercise:
- Create a new Basic level
- Delete everything under the "Lighting" folder in the Outliner
- Use Environment Light Mixer to create a complete setup (Create All)
- Experiment with different times of day by adjusting Sun Height Angle
- Enable and configure Volumetric Fog:
- ExponentialHeightFog → Volumetric Fog checkbox
- Adjust density and scattering
- Adjust Volumetric Scattering Intensity on your Directional Light
- Add some Point or Spot lights for accent lighting
- Experiment! Try different moods: bright midday, moody sunset, eerie night
✅ Tutorial 5 Complete
- You can use the Environment Light Mixer
- You know how to set up complete lighting scenarios
- You can add and control volumetric fog
- You understand volumetric scattering intensity
- You created a complete atmospheric scene from scratch
- You know professional lighting best practices
What's Next?
🌍 Advanced Lighting
Learn about IES profiles, light functions, advanced shadows, and cinematic lighting
☀️ Dynamic Time of Day
Create day/night cycles with Blueprint, animate the sun, change lighting at runtime
🎨 Post Processing
Combine lighting with post-process volumes for bloom, color grading, and effects
⚡ Lumen & Ray Tracing
Explore Unreal Engine 5's real-time global illumination and hardware ray tracing
Additional Resources
Lighting and Shadows Overview
Lumen Global Illumination
Lighting Theory:
Three-Point Lighting for Games
Understanding Kelvin Color Temperature
Congratulations!
You've completed the Lighting & Rendering Tutorial! You now have the foundational knowledge to create professional lighting in Unreal Engine. Remember: great lighting is about observation and experimentation. Study how light works in the real world, and keep practicing!