
Materials in Unreal Engine
A Complete Beginner's Guide to Creating and Using Materials
Materials control how every surface in your game looks - from shiny metal to rough concrete. This tutorial will teach you everything you need to know to create professional materials in Unreal Engine, even if you've never opened the software before.
What You'll Learn
Material Basics
Understand what materials are and how they make surfaces look realistic
Material Editor
Navigate the interface and create your first material from scratch
Working with Textures
Import and use texture images to add detail to your materials
Tutorial Topics (Click to Jump)
Topic 1: Introduction to Materials
15-20 minutes
What materials are, Material Editor interface, your first material
Topic 2: Creating PBR Materials
20-30 minutes
Base Color, Metallic, Roughness, Specular - build realistic materials
Topic 3: Working with Textures
25-30 minutes
Importing textures, Power of 2 rule, mipmaps, texture samples
Topic 4: Shortcuts & Workflow
15-20 minutes
Keyboard shortcuts, math nodes, organizing your materials
Topic 5: Material Instances
20-25 minutes
Advanced workflow technique for creating material variations efficiently
Tutorial 1: Introduction to Materials
15-20 minutes
What Are Materials?
A Material is what makes a surface look the way it does. Think of it like paint and finish for objects in your game. Materials tell Unreal Engine: "Is this surface shiny like metal? Rough like concrete? What color is it?"
Understanding PBR (Physically Based Rendering)
Unreal Engine uses something called PBR - a fancy term that means "materials behave like they would in real life." Instead of guessing how light should bounce off surfaces, PBR uses real-world physics rules.
Base Color // The color of the material (like albedo)
Metallic // Is it metal? (0 = no, 1 = yes)
Roughness // How smooth or rough? (0 = mirror smooth, 1 = very rough)
Specular // How reflective? (usually 0.5 for most materials)
Understanding Color Values (0 to 1)
Unreal Engine uses a different number system than programs like Photoshop. Instead of 0-255, Unreal uses 0 to 1:
0.5 = Middle Gray (50%)
1 = White (100%)
// Example: A medium gray in Photoshop
Photoshop: R: 128, G: 128, B: 128
Unreal: R: 0.5, G: 0.5, B: 0.5
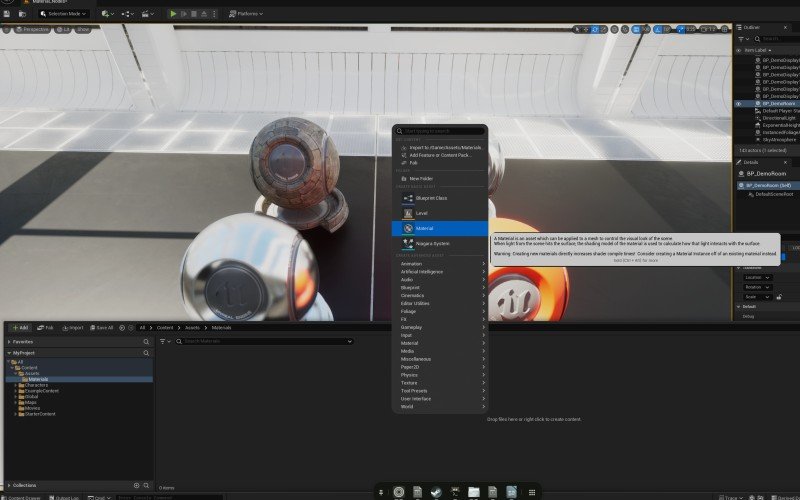
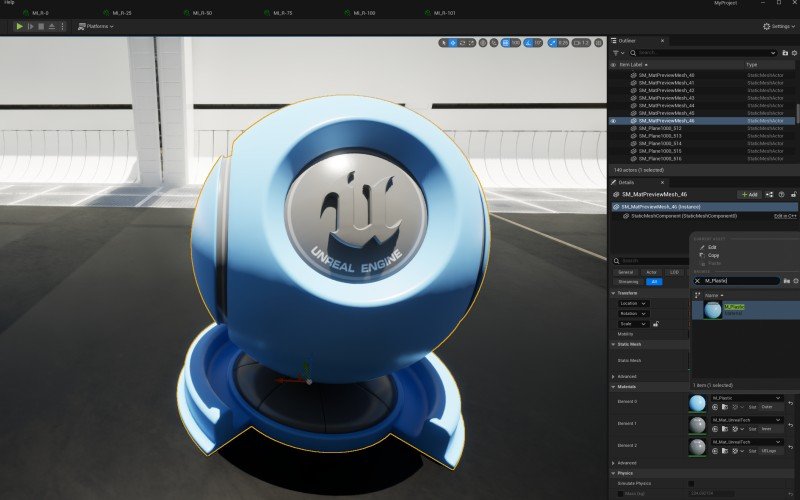
Opening the Material Editor
Let's create your first material! In Unreal Engine:
- Open the Content Browser (bottom panel in Unreal)
- Right-click in an empty area
- Select Material from the menu
- Name it M_MyFirstMaterial
- Double-click the new material to open the Material Editor
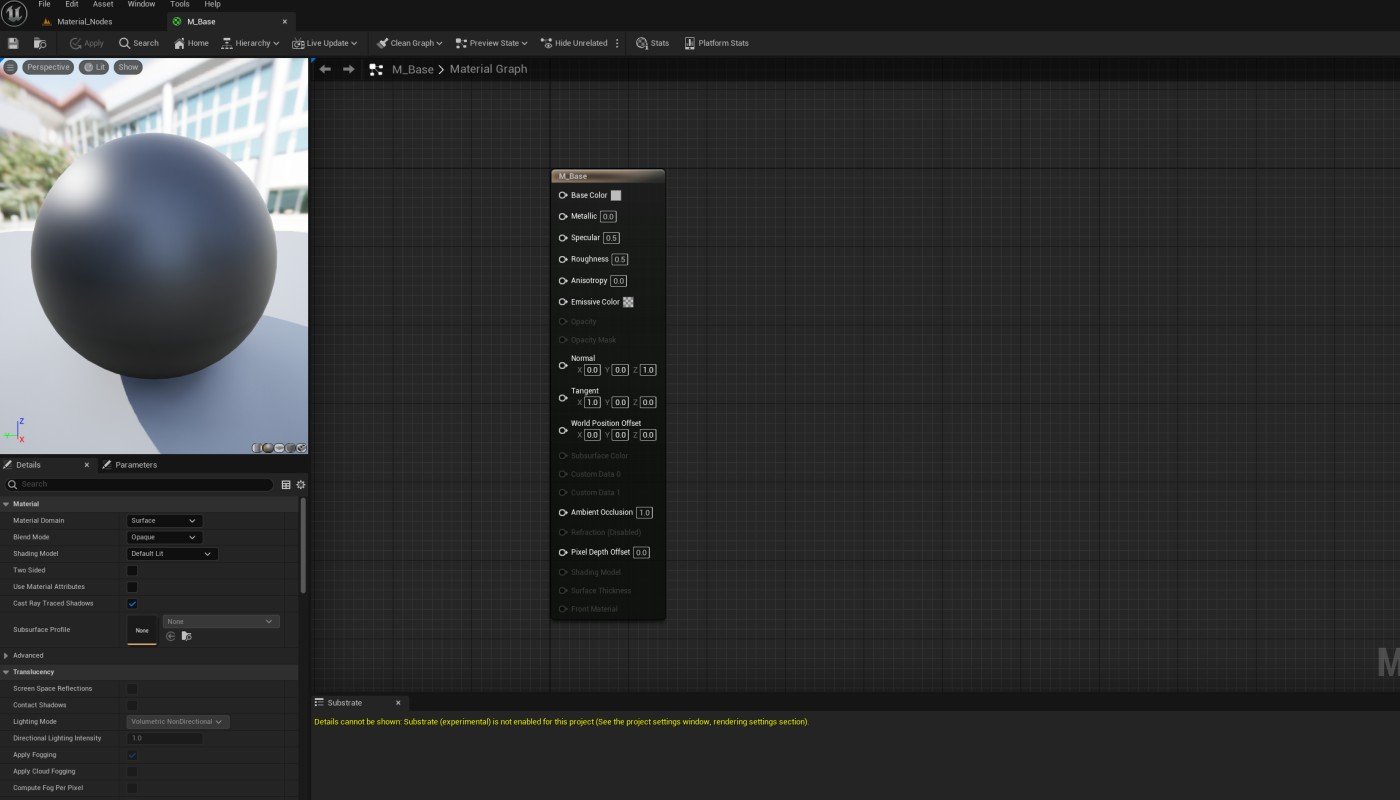
Material Editor Interface Tour
The Material Editor has several key areas you need to know:
Graph Panel // Center: Where you build your material
Palette Panel // Left: List of all available nodes
Details Panel // Right: Properties and settings
Base Material Node // The final output (always visible)
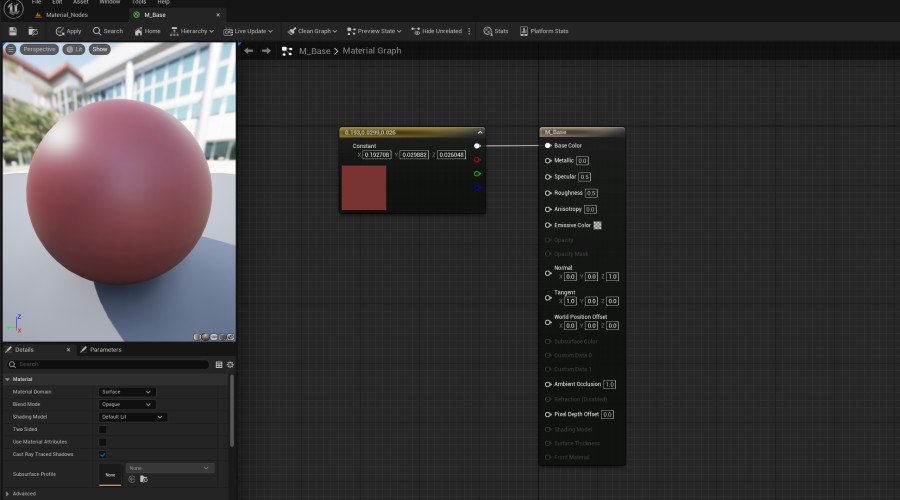
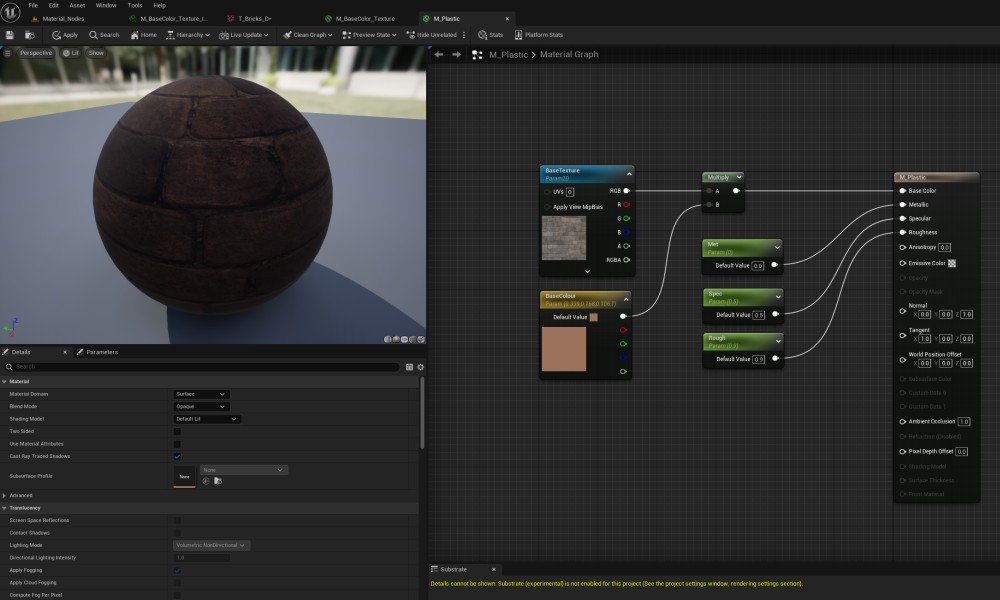
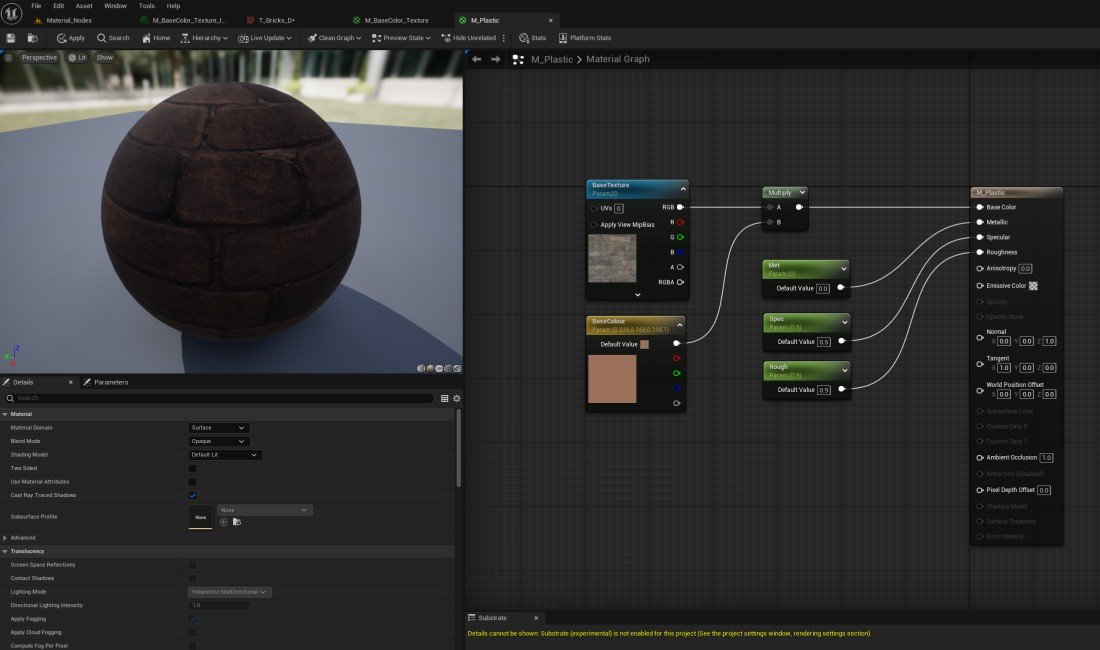
Your First Material: Solid Color
Let's create a simple solid red material to learn the basics:
- Hold the 3 key and left-click in the Graph panel (this creates a color node)
- Double-click the black square on the new node
- Pick a red color using the color picker
- Drag from the color node's output pin to the Base Color input on the Material node
- Click Apply in the top toolbar
Tutorial 1 Complete
- You understand what materials are and why they're important
- You know the basics of PBR (Base Color, Metallic, Roughness, Specular)
- You can navigate the Material Editor interface
- You created your first solid color material
Tutorial 2: Creating PBR Materials
20-30 minutes
Understanding Base Color (Albedo)
Base Color is the "true" color of your material without any lighting or shadows. Think of it as the color of the object if you photographed it in perfectly even, white light.
Understanding Metallic
The Metallic input is simple: it's either metal or it's not. Use 0 for non-metal (wood, plastic, fabric) and 1 for metal (iron, gold, aluminum).
1 = Metal (iron, copper, gold, aluminum, etc.)
// Rarely use values in between unless doing metal transitions
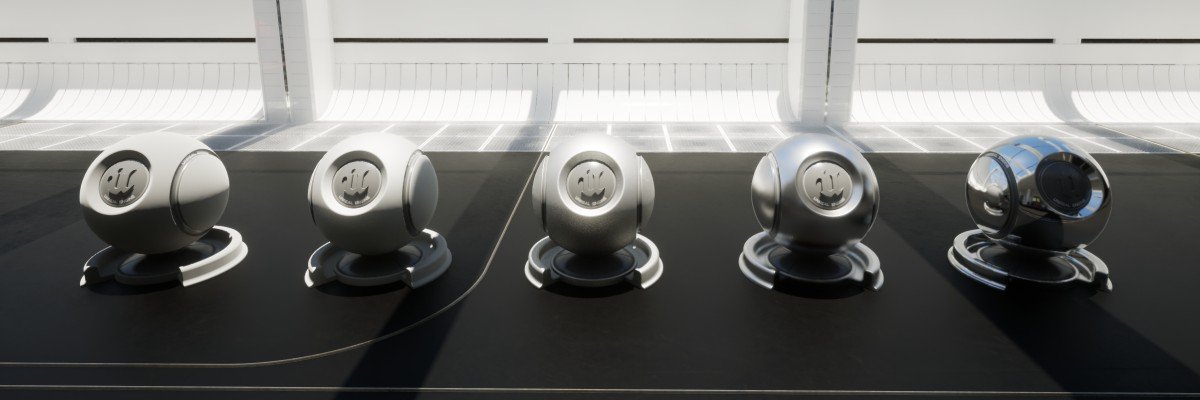
Understanding Roughness
Roughness controls how smooth or bumpy the surface is at a microscopic level. This affects how blurry or sharp reflections are.
0.3 = Glossy (car paint, polished wood)
0.7 = Semi-rough (worn metal, matte plastic)
1 = Very rough (concrete, chalk, rough fabric)
Understanding Specular
Specular controls how reflective the surface is. For 99% of materials, you can leave this at 0.5 (the default). Only change it for special cases like wet surfaces or gems.
Exercise: Create a Shiny Plastic Material
Let's create a realistic blue plastic material using PBR values:
- Create a new material: M_BluePlastic
- Hold 3 and click to create a color node
- Set the color to blue (R: 0.1, G: 0.2, B: 0.8)
- Connect it to Base Color
- Hold 1 and click to create a value node (for single numbers)
- Set the value to 0 and connect to Metallic (plastic is not metal)
- Create another value node, set to 0.3, connect to Roughness (glossy)
- Create another value node, set to 0.5, connect to Specular
- Click Apply
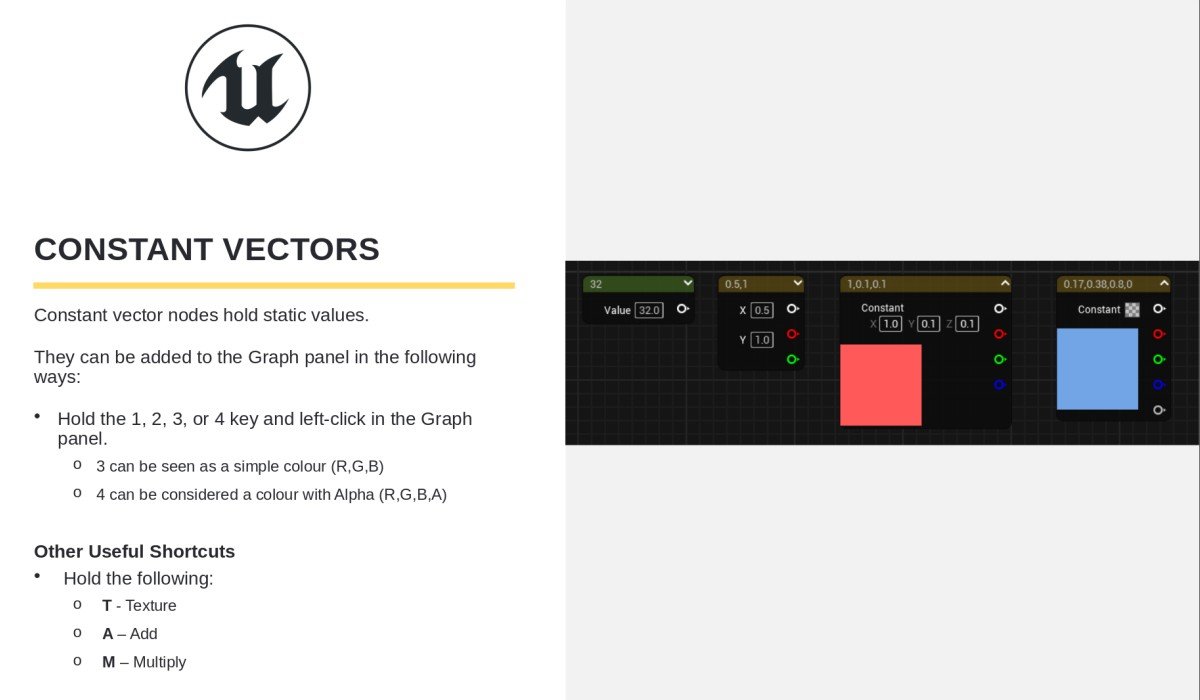
Press 1 + click = Single value (Constant)
Press 3 + click = Color (Constant3Vector)
Press 4 + click = Color with transparency
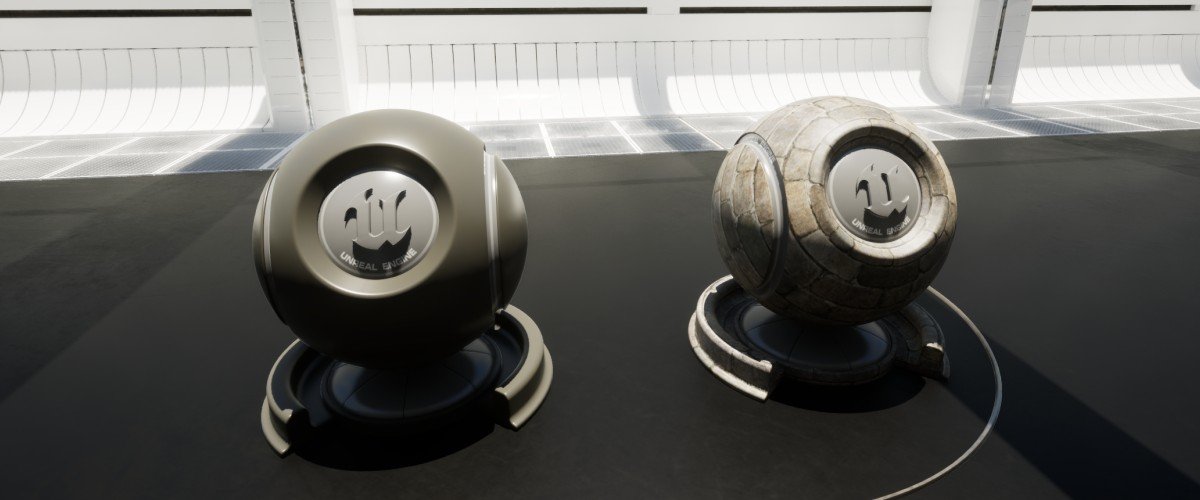
Exercise: Create a Metal Material
Now let's create an iron metal material. Notice how metals work differently:
- Create a new material: M_Iron
- Set Base Color to dark gray (R: 0.2, G: 0.2, B: 0.2)
- Set Metallic to 1 (it's metal!)
- Set Roughness to 0.6 (slightly worn metal)
- Set Specular to 0.5
- Click Apply
Applying Materials to Objects
To see your material on an actual object in your level:
- Place a cube or sphere in your level (from the Place Actors panel)
- Select the object
- In the Details panel, find the Materials section
- Click the dropdown next to "Element 0"
- Select your material from the list
Using Physically Based Values
Real-world materials have been measured and catalogued! Use this reference site for accurate PBR values:
// Examples from the site:
Gold:
Base Color: (1.0, 0.766, 0.336)
Metallic: 1.0
Roughness: 0.3
Rubber:
Base Color: (0.05, 0.05, 0.05)
Metallic: 0.0
Roughness: 0.9
Tutorial 2 Complete
- You understand all four PBR inputs (Base Color, Metallic, Roughness, Specular)
- You created a plastic material from scratch
- You created a metal material and understand the difference
- You know how to apply materials to objects
- You can find real-world PBR values for any material
Tutorial 3: Working with Textures
25-30 minutes
What Are Textures?
Textures are image files (like JPG or PNG) that add detail to your materials. Instead of a solid color, textures give you patterns, wear, scratches, and realistic surface details.
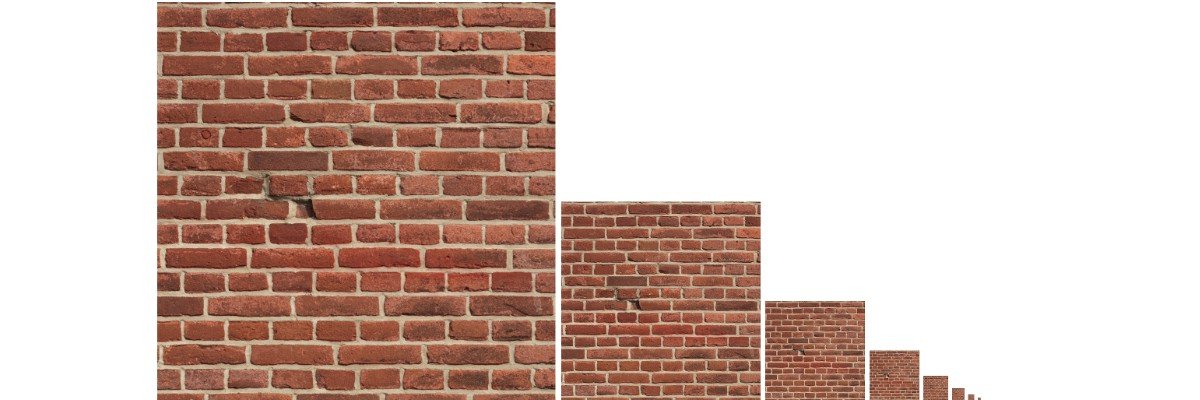
The Power of 2 Rule
Game engines require texture dimensions to be "powers of 2" for technical reasons. This means each side must be one of these numbers:
16, 32, 64, 128, 256, 512, 1024, 2048, 4096, 8192
Valid: 512 x 512, 1024 x 2048, 256 x 1024
Invalid: 500 x 500, 1920 x 1080, 300 x 600
Texture Size Limits
Unreal Engine has minimum and maximum texture sizes:
Maximum Size: 8192 x 8192 pixels
// Recommended sizes for different uses:
UI Icons: 128 x 128 or 256 x 256
Props/Objects: 1024 x 1024 or 2048 x 2048
Terrain/Large Surfaces: 2048 x 2048 or 4096 x 4096
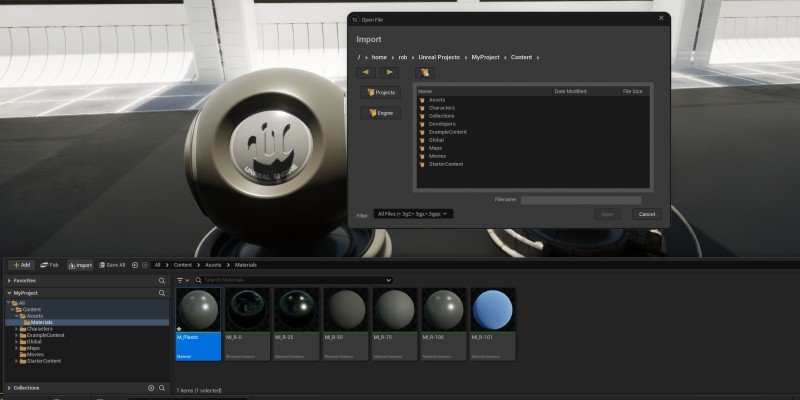
Importing Textures
To bring texture images into Unreal Engine:
- In the Content Browser, click the Import button
- Navigate to your texture file (PNG, JPG, TGA, etc.)
- Click Open
- Unreal will import it as a Texture asset
The Texture Editor
Double-click any texture in the Content Browser to open the Texture Editor:
Details Panel: Texture settings and properties
Toolbar: Controls for zoom, mipmap preview, etc.
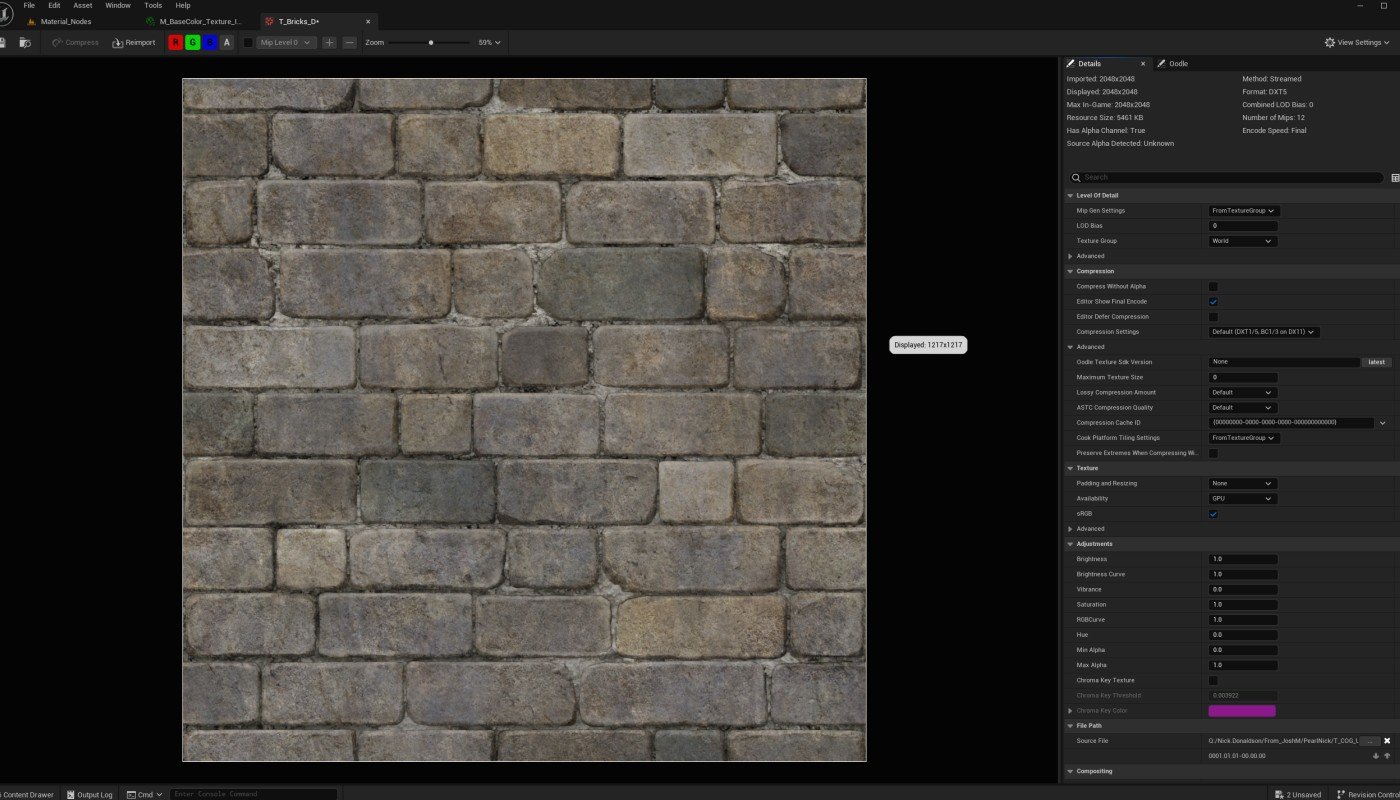
Understanding Mipmaps
Unreal automatically creates mipmaps - smaller versions of your texture for when objects are far away from the camera.
Level 0: 2048 x 2048 (original, close-up)
Level 1: 1024 x 1024
Level 2: 512 x 512
Level 3: 256 x 256
...down to 1 x 1 (very far away)
Adding Textures to Materials
To use a texture in your material:
- Open your material in the Material Editor
- Find your texture in the Content Browser
- Drag the texture from Content Browser into the Material Graph
- This creates a Texture Sample node
- Connect the RGB output to Base Color
- Click Apply
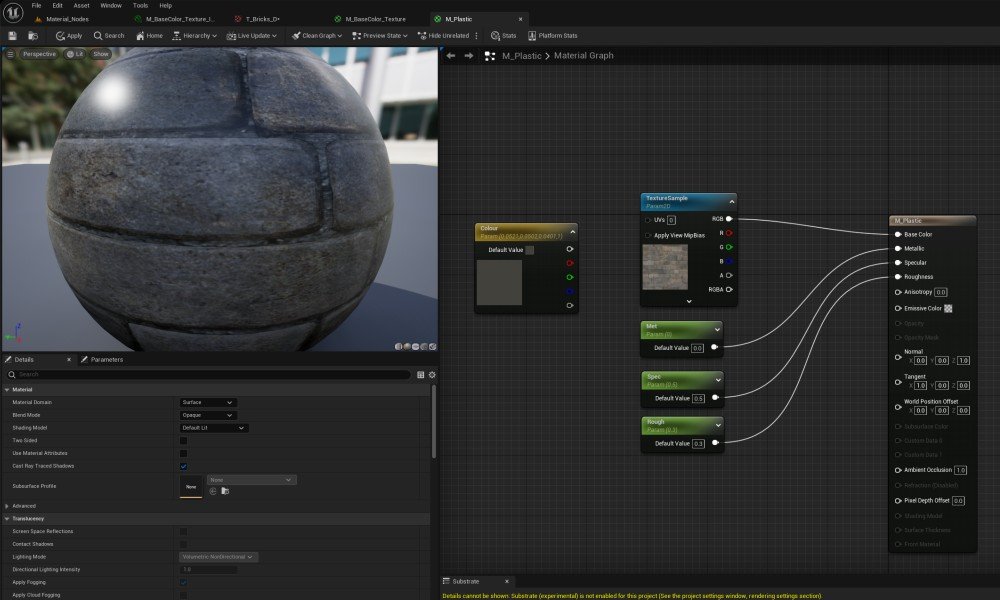
Exercise: Create a Textured Material
Let's create a complete material using a texture:
- Import a color texture (or download a free one from a site like textures.com)
- Create a new material: M_Textured
- Drag your texture into the graph
- Connect the RGB output to Base Color
- Add constant values for Metallic (0), Roughness (0.7), and Specular (0.5)
- Apply the material to an object in your scene
Tutorial 3 Complete
- You understand what textures are and why they're important
- You know the Power of 2 rule for texture sizes
- You can import textures into Unreal Engine
- You understand what mipmaps are and why they exist
- You created a material using a texture
Tutorial 4: Material Editor Shortcuts & Workflow
15-20 minutes
Essential Keyboard Shortcuts
These shortcuts will speed up your material creation workflow dramatically:
1 + Left Click = Constant (single number)
2 + Left Click = Constant2Vector (X, Y)
3 + Left Click = Constant3Vector (R, G, B color)
4 + Left Click = Constant4Vector (R, G, B, A)
T + Left Click = Texture Sample
Math Operations:
A + Left Click = Add
M + Left Click = Multiply
S + Left Click = Subtract
D + Left Click = Divide
Navigating the Graph
Moving around the Material Graph efficiently:
Right Mouse + Drag = Pan the view
Mouse Wheel = Zoom in/out
Left Click + Drag = Select multiple nodes
Ctrl + D = Duplicate selected node
Delete = Delete selected node
C = Add comment box
Connecting Nodes
How to wire nodes together:
- Click and drag from an output pin (right side of node)
- Release on an input pin (left side of another node)
- To remove a connection, hold Alt and click the input pin
White = Float (single number)
Yellow = Vector3 (3 numbers like RGB)
Green = Vector2 (2 numbers like UV coordinates)
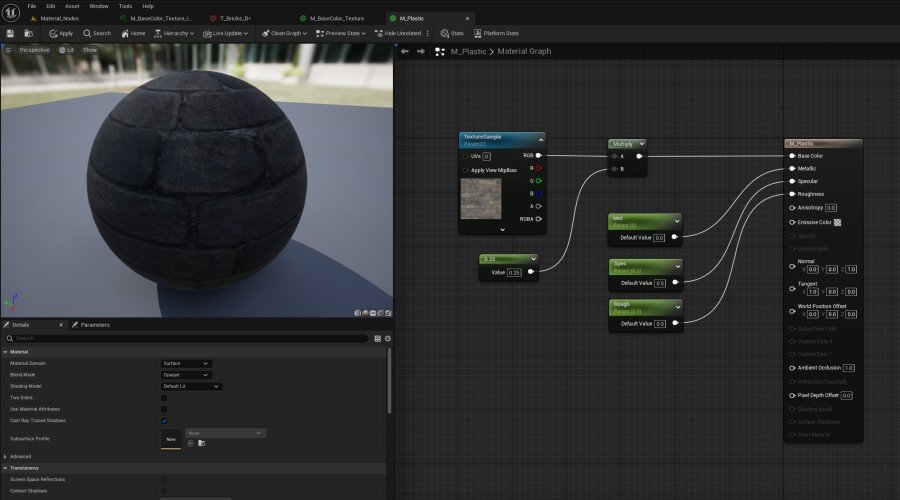
Using Math Nodes: Multiply
The Multiply node lets you make colors darker or lighter:
Texture (RGB) → Multiply → Base Color
↑
0.5 (darker) or 2.0 (brighter)
Using Math Nodes: Add
The Add node combines two values together:
Texture (RGB) → Add → Base Color
↑
Red (0.2, 0, 0) adds red tint
Exercise: Create a Customizable Material
Practice using math nodes to create an adjustable material:
- Create a new material: M_Adjustable
- Add a texture to the graph
- Press M + click to create a Multiply node
- Connect: Texture → Multiply → Base Color
- Create a Constant value (press 1 + click)
- Connect the Constant to the Multiply's second input
- Try different values: 0.5 (darker), 1.0 (normal), 2.0 (brighter)
Organizing with Comments
Keep your materials organized with comment boxes:
- Select the nodes you want to group
- Press C to create a comment box
- Type a description like "Color Adjustment" or "Texture Setup"
- The comment box moves with the nodes inside it
Tutorial 4 Complete
- You know all essential Material Editor keyboard shortcuts
- You can navigate the graph efficiently
- You understand how to use Multiply and Add nodes
- You can organize materials with comment boxes
Tutorial 5: Material Instances
20-25 minutes
What Are Material Instances?
A Material Instance is a "child" copy of a master material. Instead of creating 50 different materials from scratch, you create ONE master material and 50 instances with different settings.
Instant previews (no compilation wait)
Can be edited in real-time (even while playing)
Better performance
Easier to manage large projects
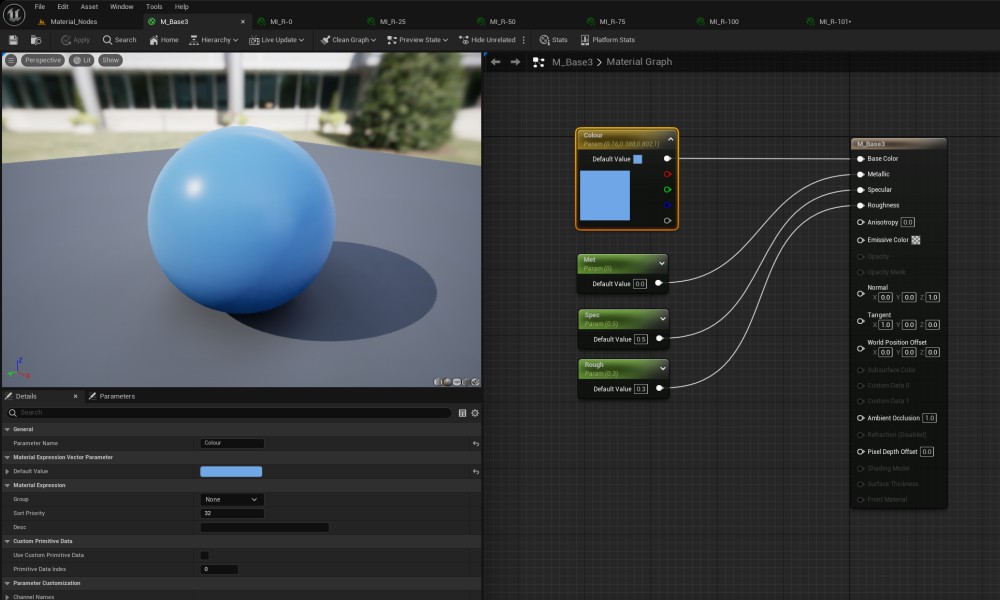
Parameters: Making Values Editable
To create values that can be changed in instances, you need to use Parameters instead of regular constants:
Scalar Parameter = Single number (roughness, metallic, etc.)
Vector Parameter = Color (base color, tint, etc.)
Texture Parameter = Texture (swap textures per instance)
Shortcuts:
S + Click = Scalar Parameter
V + Click = Vector Parameter
Creating a Master Material
Let's create a master PBR material with adjustable parameters:
- Create a new material: M_MasterPBR
- Press V + click to create a Vector Parameter
- Select the node, in Details panel name it "BaseColor" and set a default color
- Connect it to Base Color on the main material node
- Press S + click to create a Scalar Parameter
- Name it "Metallic", set default to 0
- Connect to Metallic input
- Repeat for "Roughness" (default 0.5) and "Specular" (default 0.5)
- Click Apply and Save
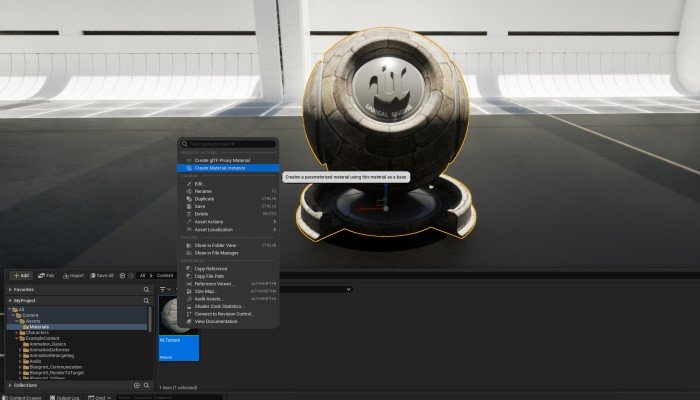
Creating Material Instances
Now let's create instances from your master material:
- In Content Browser, right-click on M_MasterPBR
- Select Create Material Instance
- Name it MI_Gold (prefix instances with "MI_")
- Double-click to open the Instance Editor
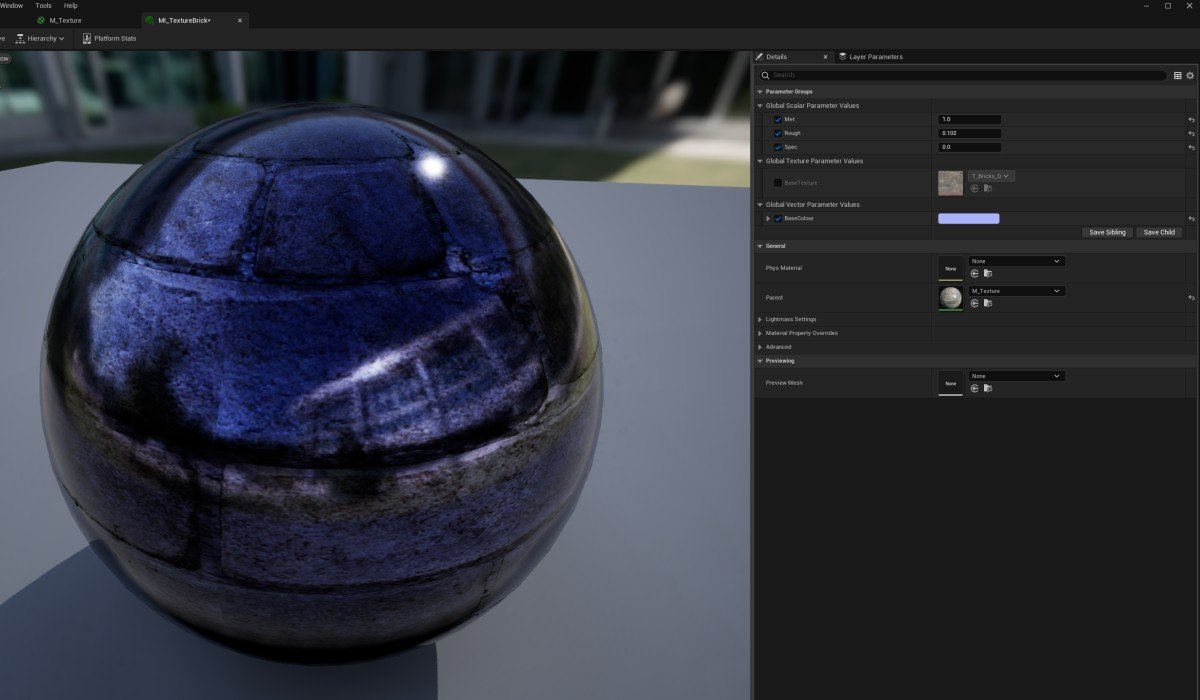
Editing Instance Parameters
The Instance Editor looks different from the Material Editor - it's just a list of parameters you can change:
- In the Instance Editor, you'll see all parameters from the master
- Check the box next to a parameter to enable editing it
- For the Gold instance, set:
- BaseColor: (1.0, 0.766, 0.336)
- Metallic: 1.0
- Roughness: 0.3
- Specular: 0.5
- The preview updates instantly - no compilation needed!
Exercise: Create Multiple Instances
Practice creating instances for different materials:
- From the same master material, create these instances:
BaseColor: (0.955, 0.637, 0.538)
Metallic: 1.0, Roughness: 0.4
MI_Plastic_Red:
BaseColor: (0.8, 0.1, 0.1)
Metallic: 0.0, Roughness: 0.3
MI_Rubber:
BaseColor: (0.05, 0.05, 0.05)
Metallic: 0.0, Roughness: 0.9
Real-Time Editing While Playing
One amazing feature of instances: you can edit them while your game is running!
- Apply one of your material instances to an object
- Click the Play button to start the game
- While playing, alt-tab back to the editor
- Open the material instance and change values
- Alt-tab back to the game - it updates in real-time!
When to Use Instances vs Regular Materials
Here's a guide for choosing between master materials and instances:
You need complex node logic
You're creating the "template" for variations
You need to add new features/connections
Use Material Instances when:
You need variations of the same material
You want to adjust values without recompiling
You're tweaking parameters for art direction
You need runtime-editable materials
Tutorial 5 Complete
- You understand what Material Instances are and why they're powerful
- You can create parameters in master materials
- You created a flexible master PBR material
- You created multiple instances with different looks
- You know when to use instances vs regular materials
What's Next?
Advanced Materials
Learn about Normal maps, Emissive materials, Opacity, and advanced techniques
Material Functions
Create reusable node groups to build complex materials faster
Performance
Optimize materials for games, reduce instruction count, mobile considerations
Dynamic Materials
Control materials with Blueprint, create interactive effects, runtime customization
Additional Resources
Unreal Engine Materials Guide
PBR Reference Values:
Physically Based Material Database
// Remember to set "Default Engine" to Unreal!
Free Texture Resources:
Poly Haven (Free PBR Textures)
Textures.com (Free & Paid)
Congratulations!
You've completed the Materials Tutorial! You now have the foundational knowledge to create professional materials in Unreal Engine. Keep practicing, experiment with different values, and don't be afraid to break things - that's how you learn!